
Comprehensive Guide to Setting Up and Using Passkeys on Windows 11 Devices

Comprehensive Guide to Setting Up and Using Passkeys on Windows 11 Devices
Quick Links
- What Is a Passkey?
- What Platforms Support Passkeys?
- How to Create and Save a Passkey to Your Windows 11 PC
- How to Use a Passkey to Sign In to a Site or App
- How to View and Delete Passkeys on Windows 11
Key Takeaways
- To create a passkey, access the account security page of a passkey-supported site or app, use the passkey creation option, and save the passkey to your PC.
- To use a passkey, access the login page of a site or app, choose the passkey authentication method, and use Windows Hello to log in to the service.
- To view saved passkeys, head into Settings > Accounts > Passkey Settings. To remove a passkey, click the three dots next to an item and choose “Delete Passkey.”
Passkeys are alternatives to passwords and make signing in to your favorite websites and apps faster. We’ll show you how to generate, use, view, and delete passkeys on your Windows 11 PC.
What Is a Passkey?
A passkey is a replacement for your website or app account password. When you create a passkey with your favorite site or app, you can use your device’s authentication method to log in to that site or app.
For example, with Windows 11, you can use the Windows Hello functionality to sign in to various services. This means you can use your PIN, facial recognition , or fingerprint scanning to log in to multiple services and apps.
Passkeys have multiple advantages over passwords. The main one is that, unlike passwords, it is borderline impossible to steal passkeys. Another advantage is that passkeys are almost completely impervious to phishing. It is relatively easy to trick a human into entering a password on a fake website, but passkeys aren’t so easily fooled.
What Platforms Support Passkeys?
Many popular sites and apps support passkeys, as this is a quick and convenient way to log in. Some services that support this feature are:
You can find a list of passkey-supported platforms on the Passkeys site .
How to Create and Save a Passkey to Your Windows 11 PC
To generate and save a passkey, you’ll first visit your favorite website or app’s account settings. From there, you’ll create the key and then save it to your PC. In this guide, we’ll demonstrate how to do that with a Google account.
Begin by launching Chrome, Firefox, Edge, or Brave web browser on your PC. Head to Google’s My Account site and sign in to your account.
After logging in, from the left sidebar, select “Security.” On the right pane, scroll down to the “How You Sign In to Google” section and choose “Passkeys and Security Keys.”
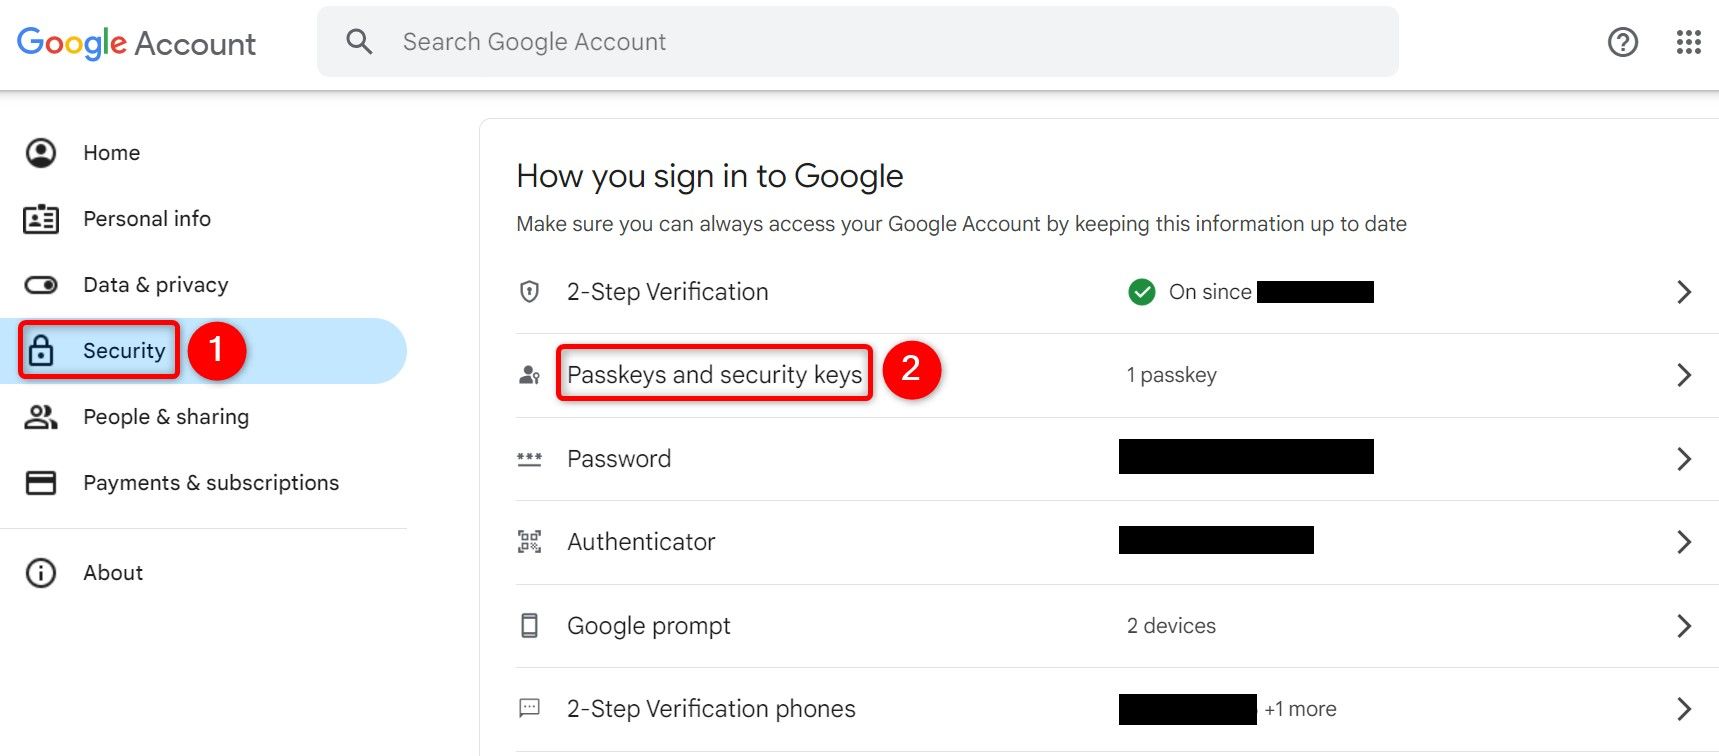
Google will likely prompt you to enter your account password. Do so and continue.
When the following page opens, at the top, click “Create a Passkey.”
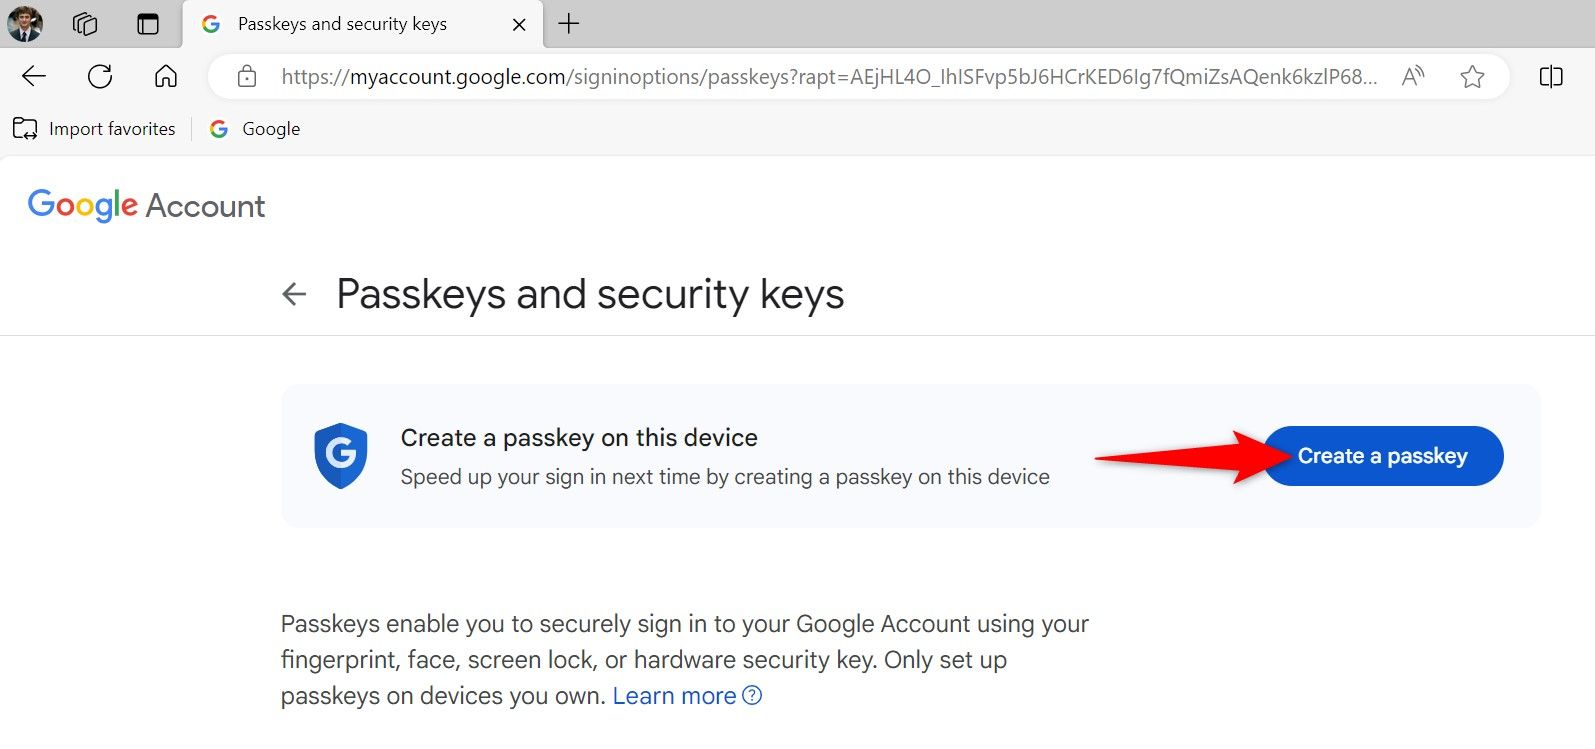
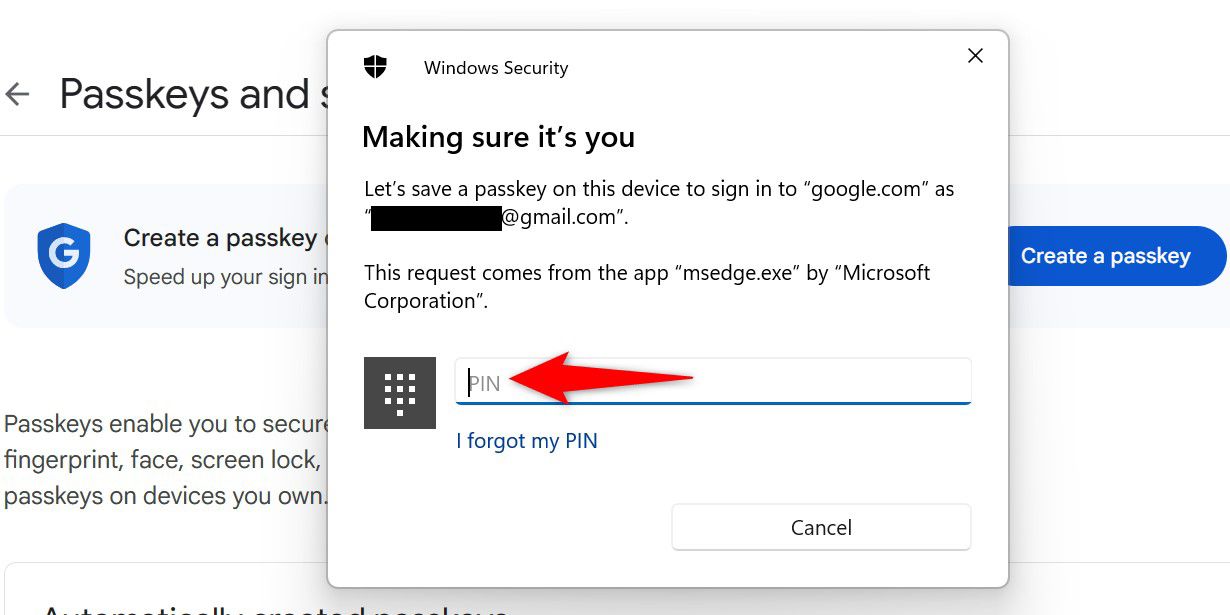
You’ll see a “Windows Security” prompt. Authenticate yourself using your PIN, facial recognition, or fingerprint scanning.
You’ll see a “Passkey Saved” message confirming a passkey for your Google account was created and saved to your PC. Close the window by selecting “OK.”
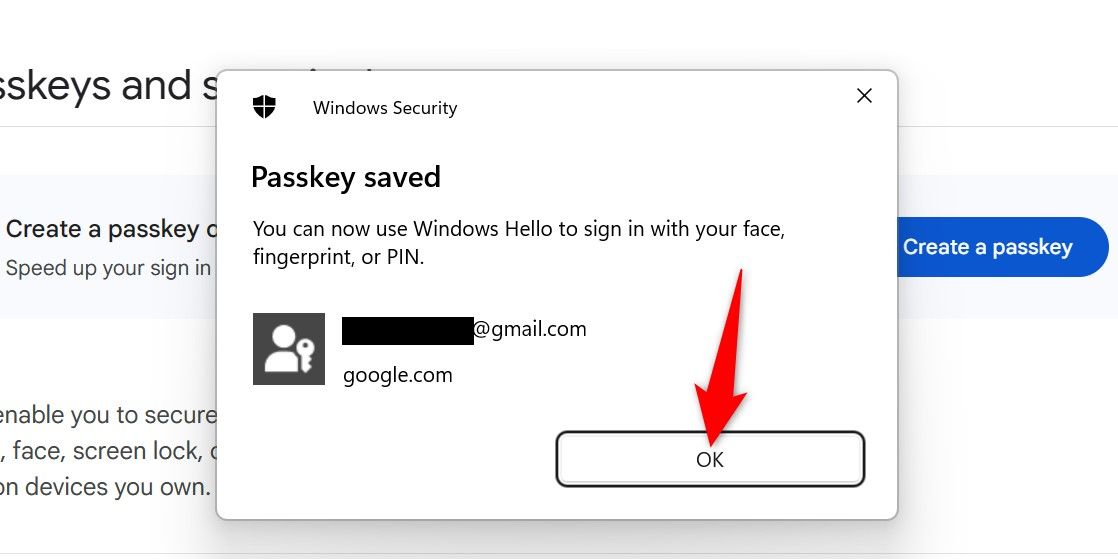
And that’s it. You’ve successfully created a replacement for your Google account password.
How to Use a Passkey to Sign In to a Site or App
To use a passkey to sign in to a site or app, access that item’s login page and choose passkey instead of password. Here’s how to do that for a Google account.
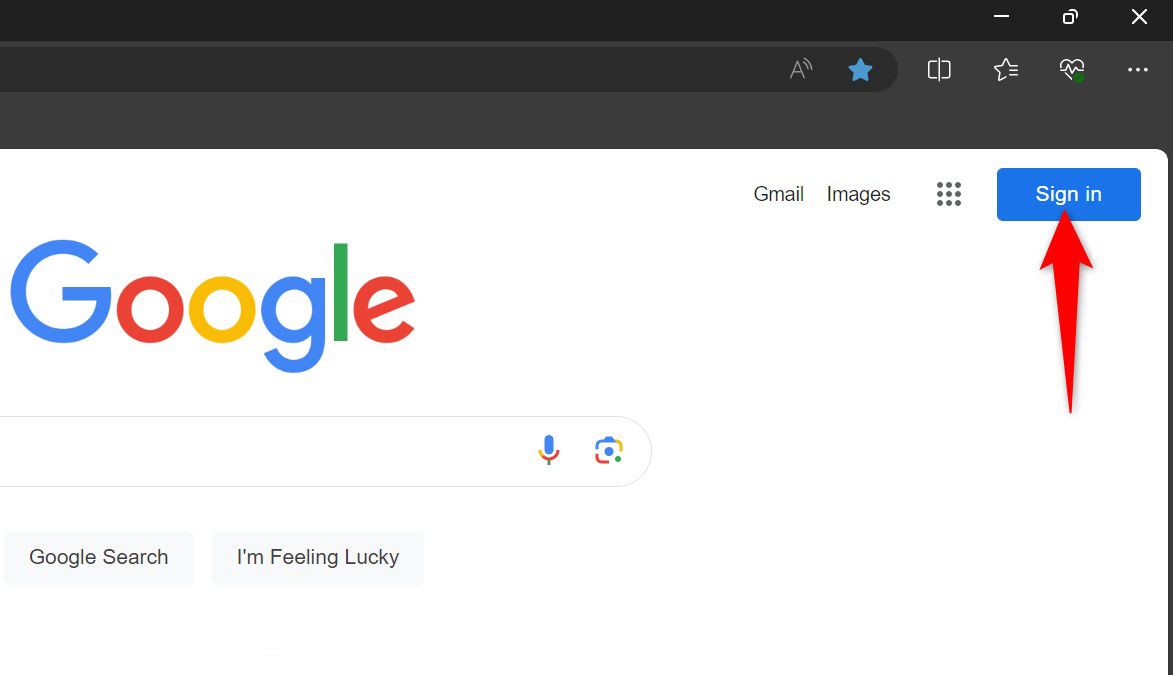
Launch Google.com and click “Sign In” in the top-right corner.
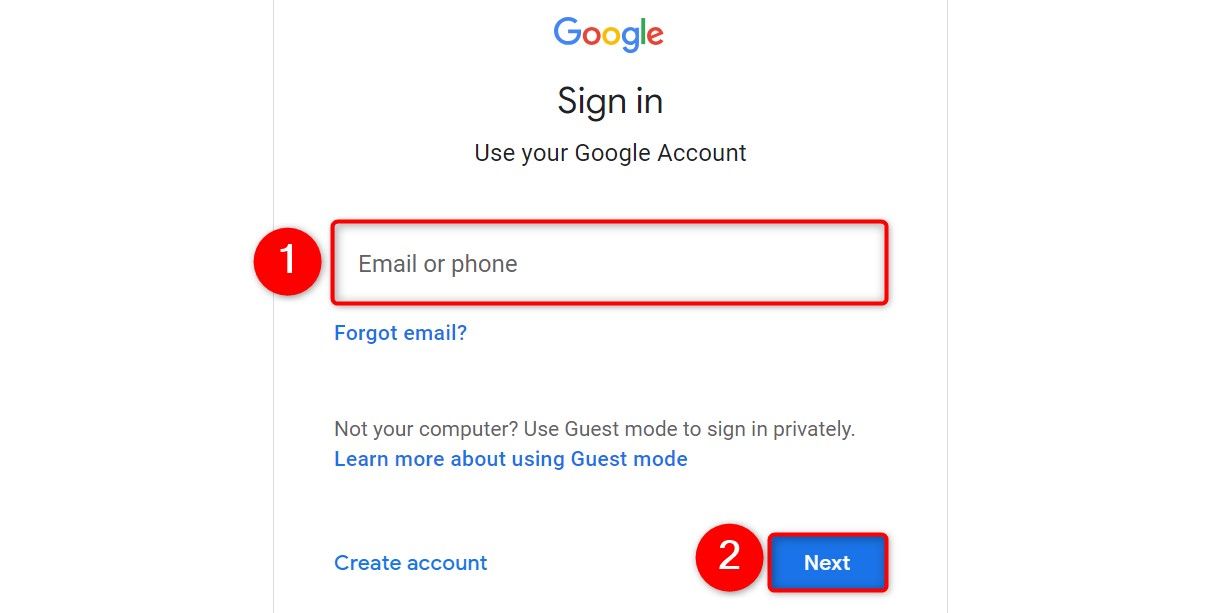
Enter your Google account username and click “Next.”
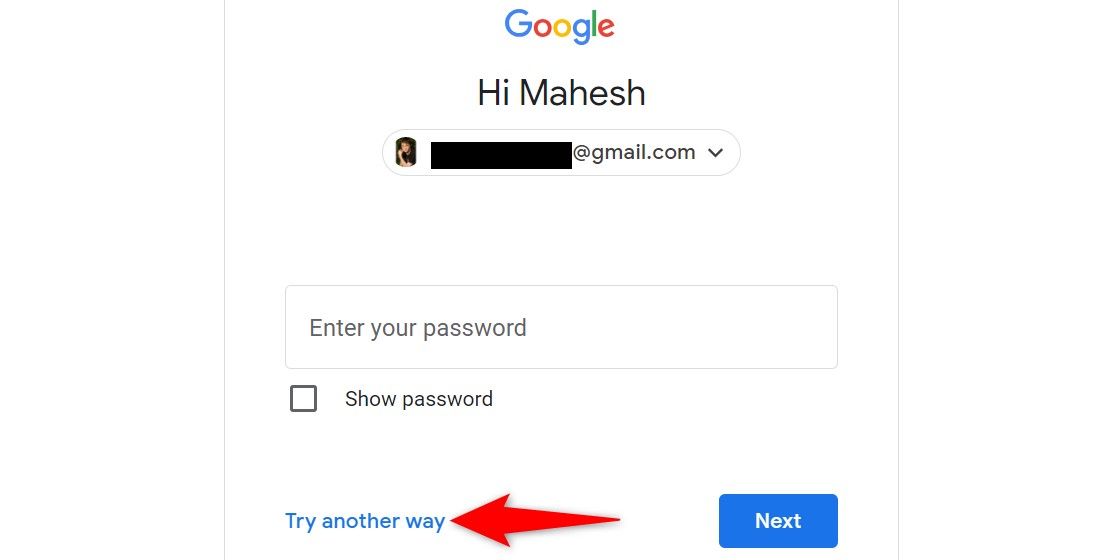
On the password page, click “Try Another Way” to see alternate options.
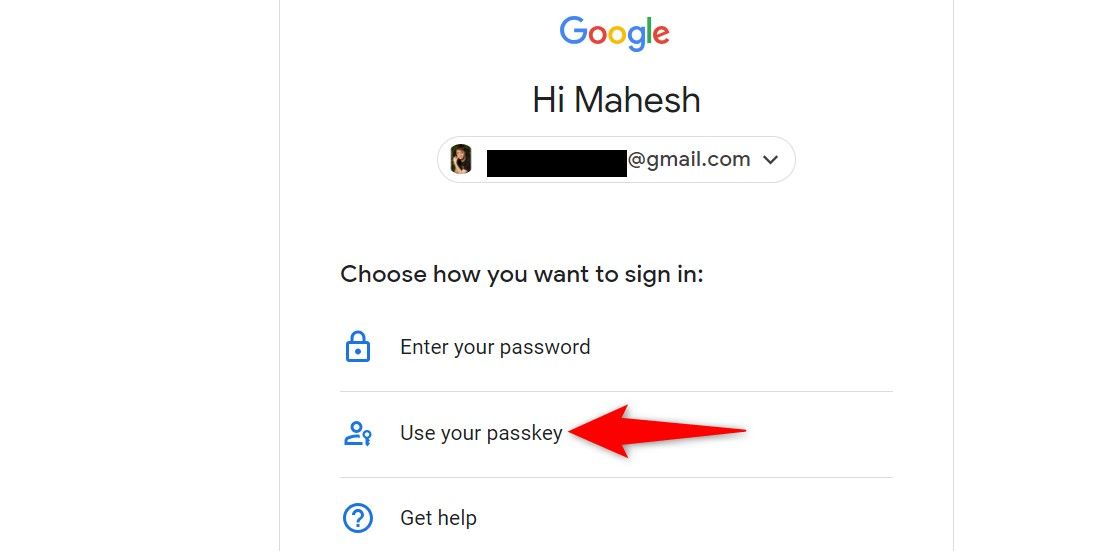
Select “Use Your Passkey” to utilize the saved passkey to log in to your account.
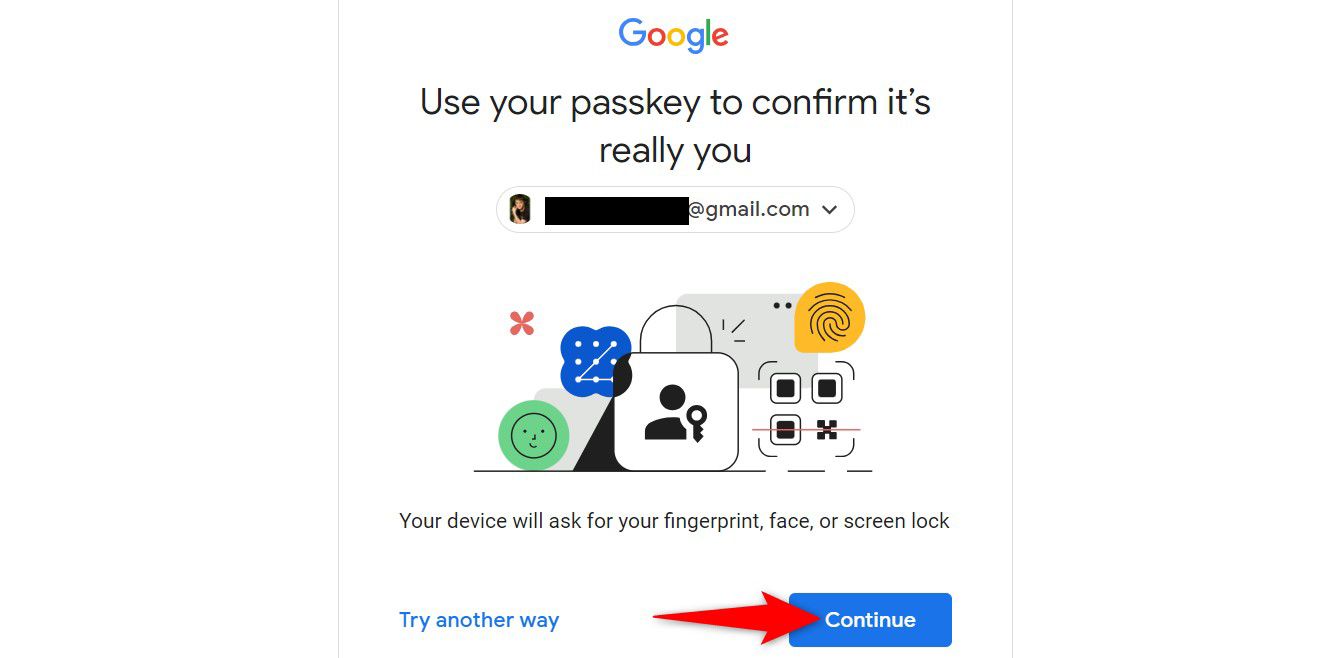
Select “Continue” and Google will trigger the “Windows Security” prompt.
In the “Windows Security” prompt, select the PIN, facial recognition, or fingerprint scanning authentication method.
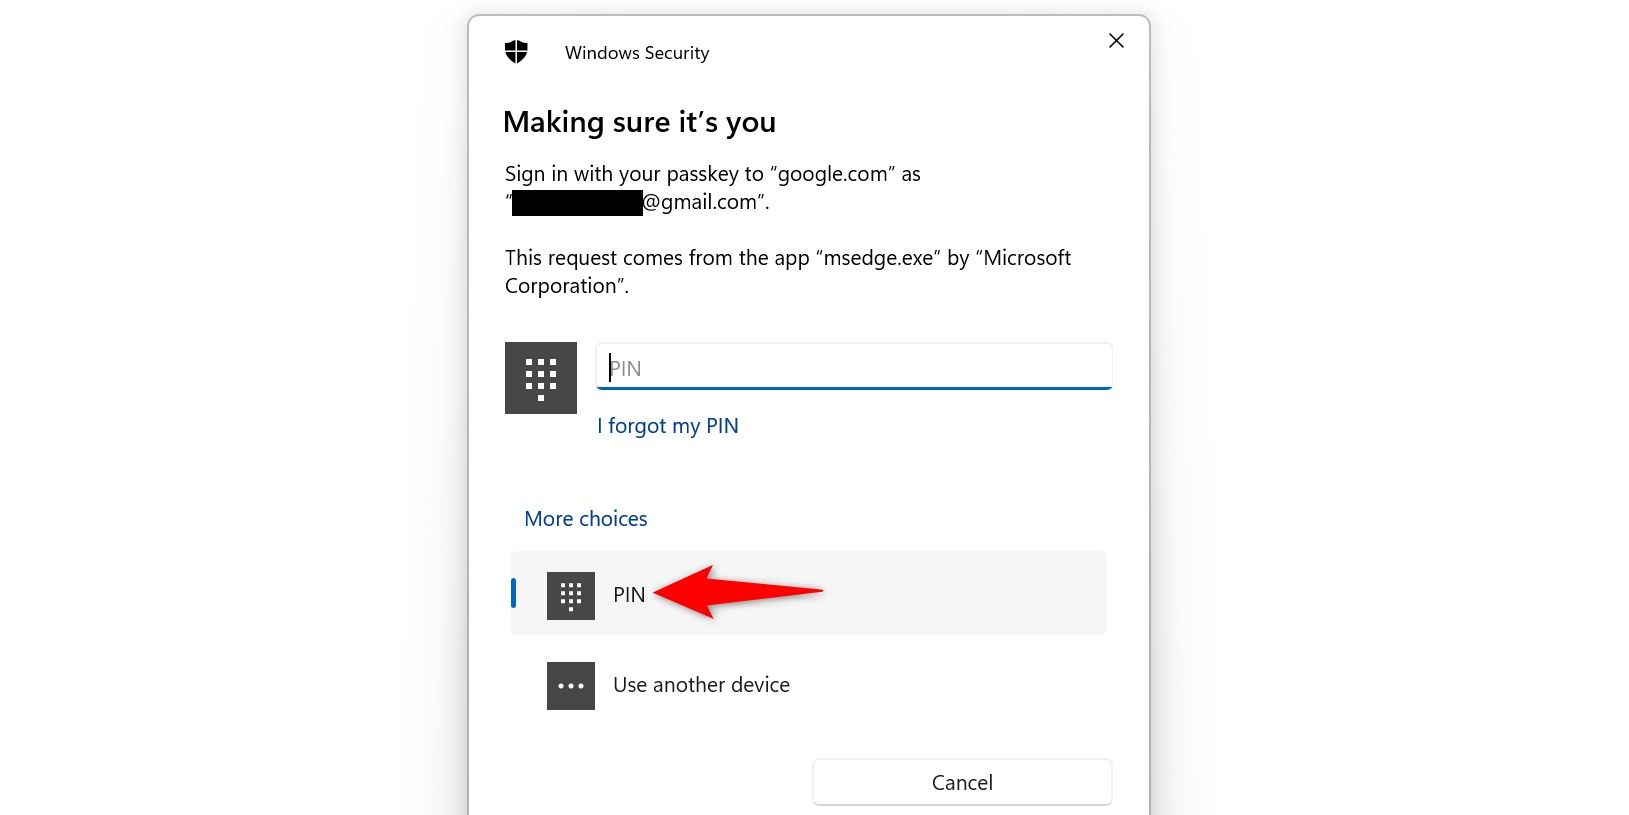
After you’ve authenticated yourself, you’ll be signed in to your account.
How to View and Delete Passkeys on Windows 11
If you want to see what passkeys you’ve saved, or you want to delete a specific passkey, use the Settings app.
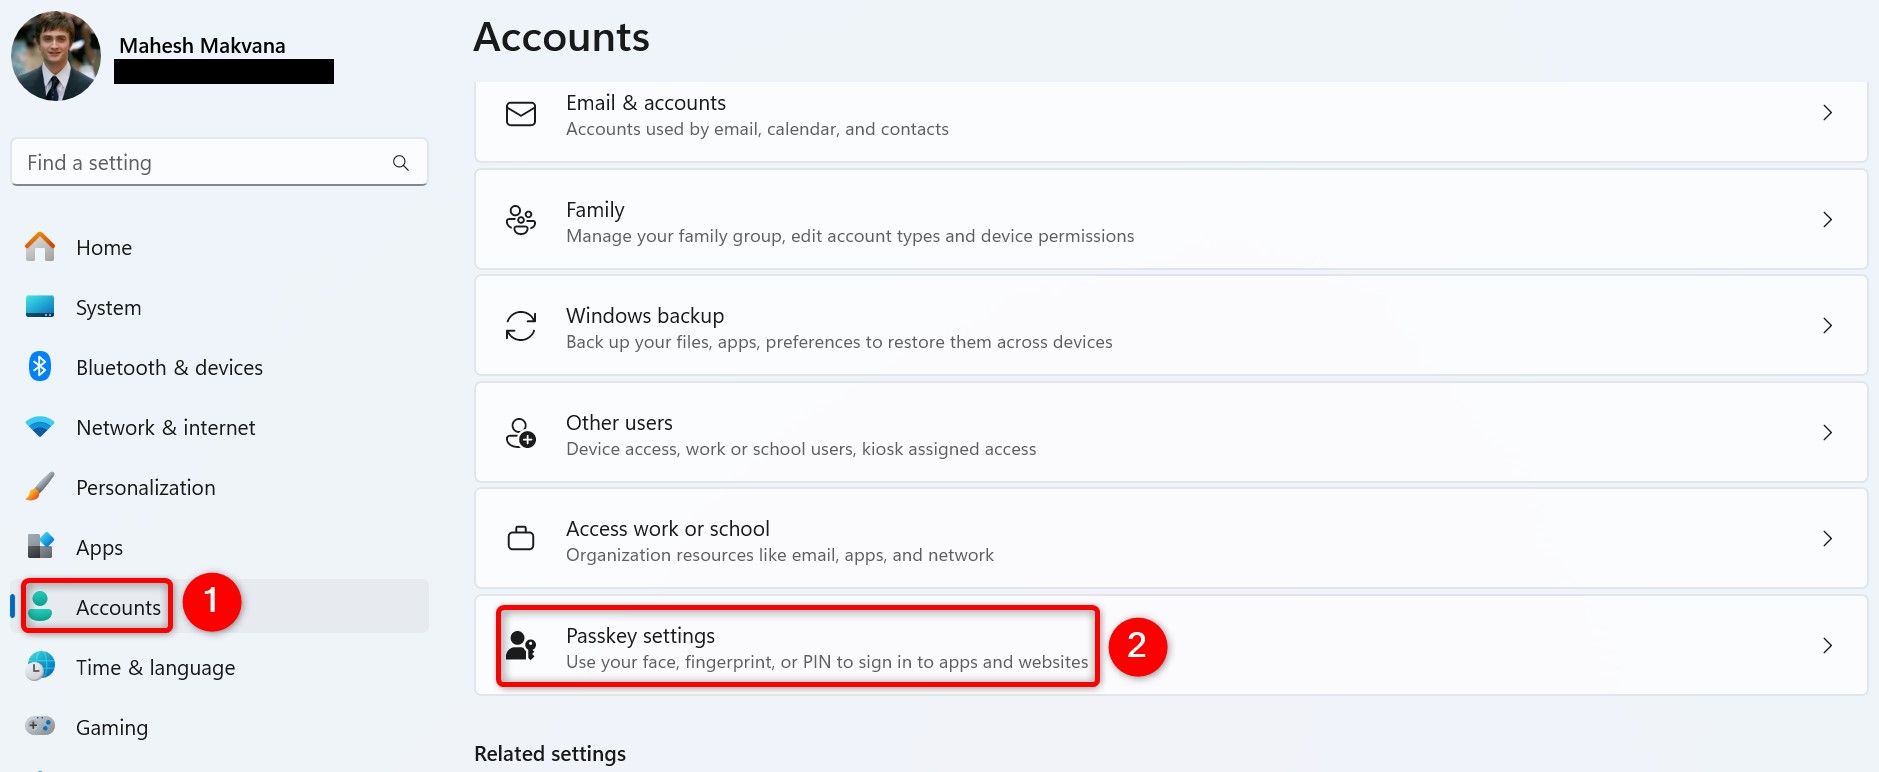
Open Settings using Windows+i. In the left sidebar, click “Accounts.” On the right pane, choose “Passkey Settings.”
On the “Passkeys” page, you’ll find a list of saved passkeys. To retrieve a specific passkey, use the search box at the top.
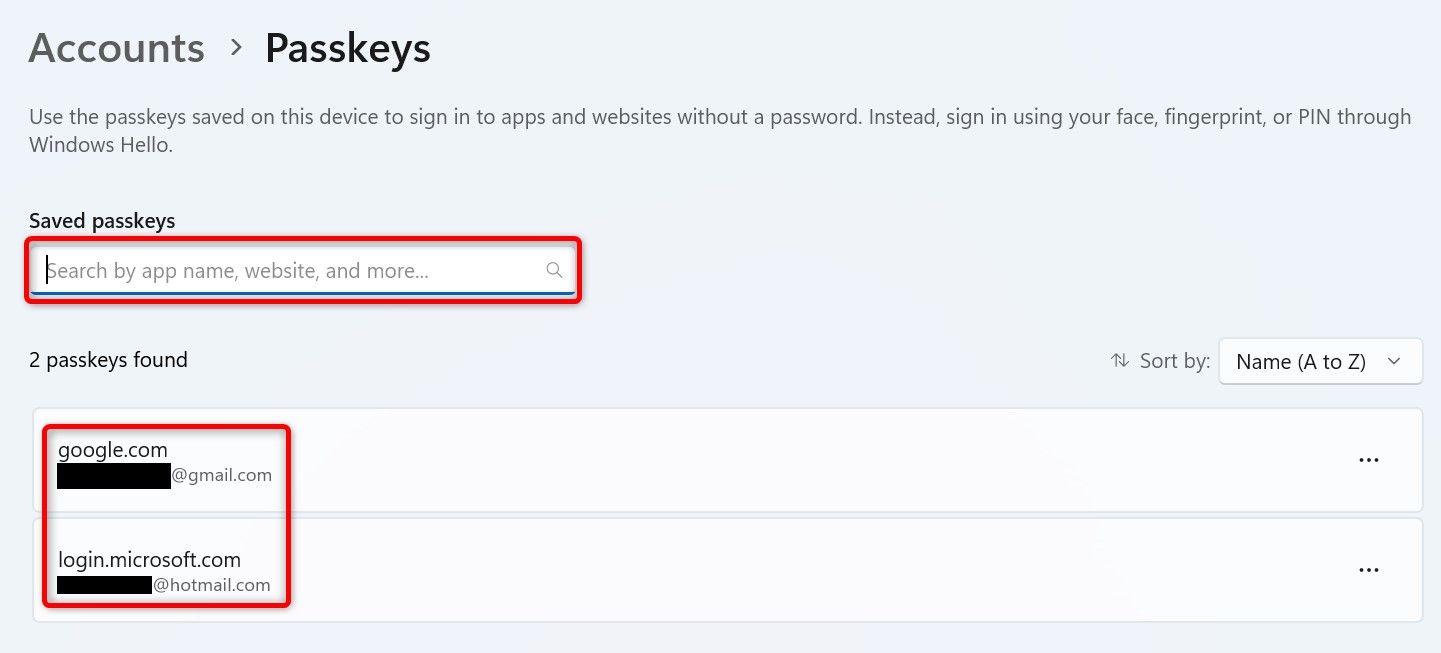
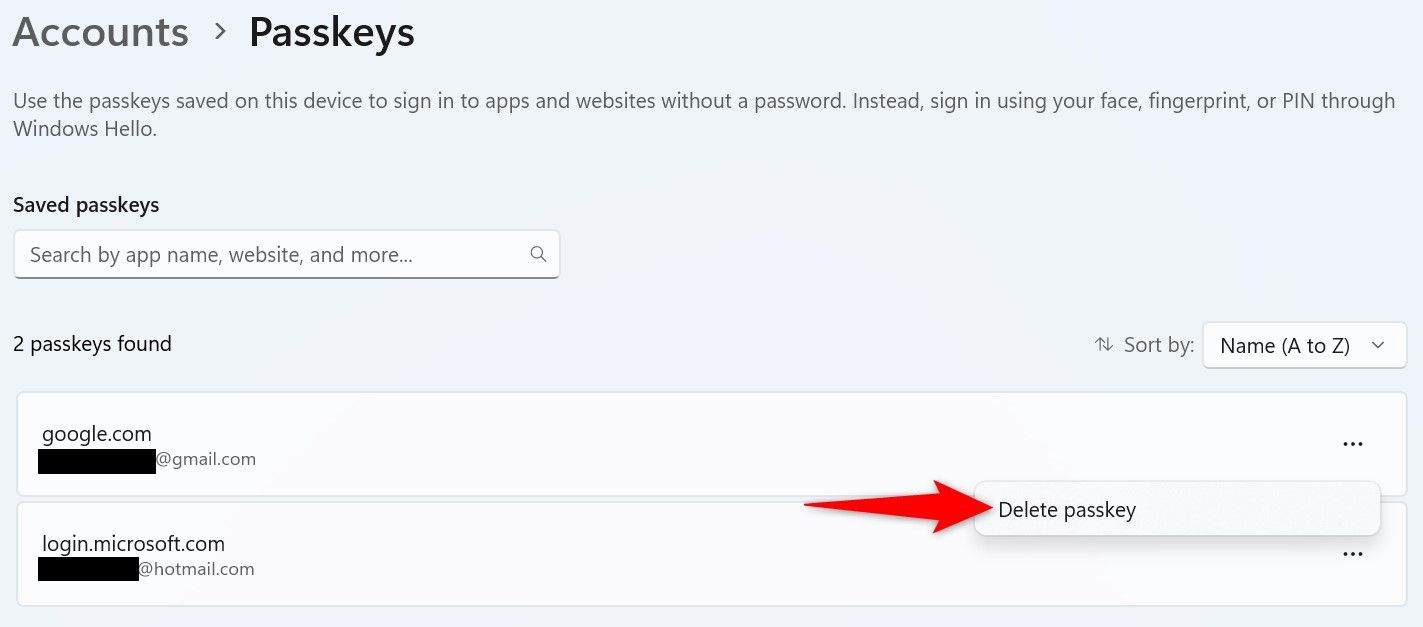
To remove a specific passkey, click the three dots next to that item and choose “Delete Passkey.”
In the open prompt, confirm your action by selecting “Delete.”
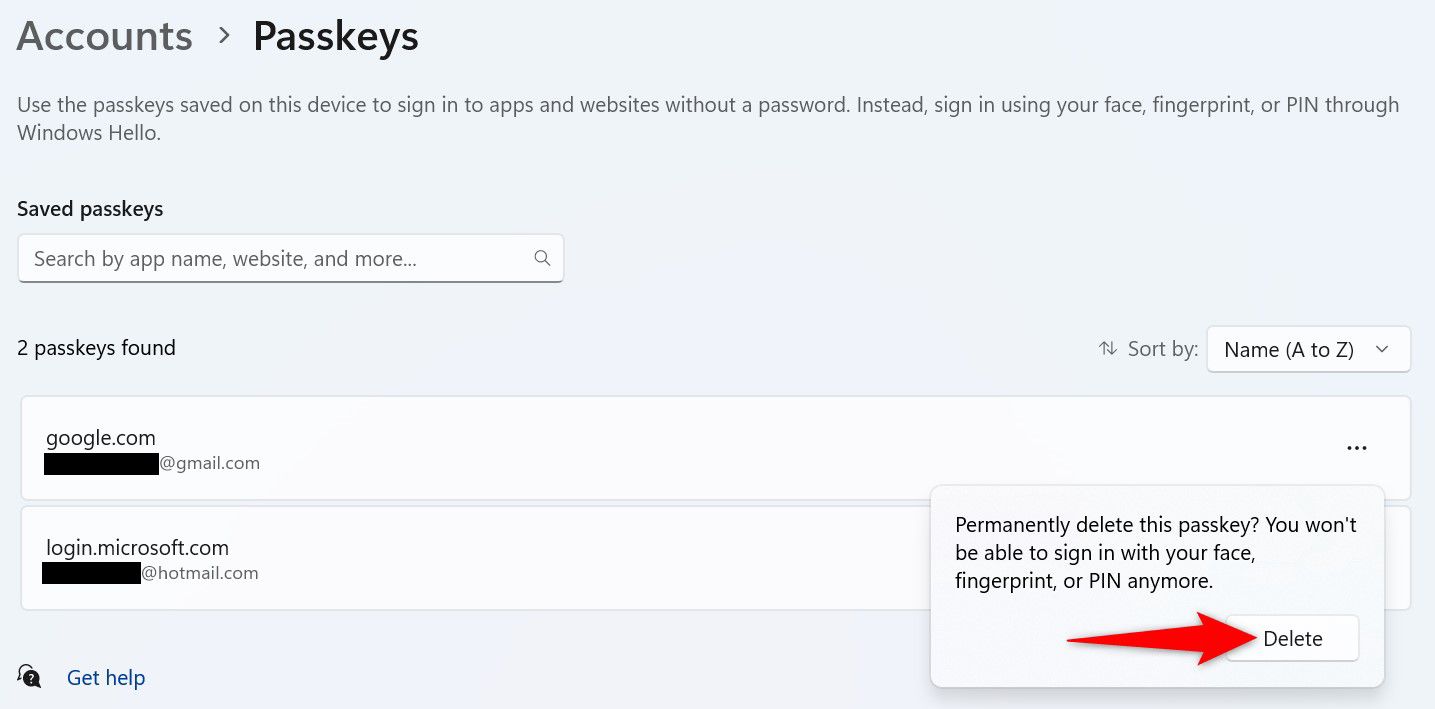
Windows 11 has removed the chosen passkey from the database. You can’t log in to that site or app using your PC’s authentication method any more (but you can always re-create any required passkeys).
And that’s how you make signing in to sites and apps faster and more convenient on your Windows 11 PC. Remember to set up two-factor authentication on all of your important accounts, too!
Also read:
- [Updated] 2024 Approved Wave Goodbye to Costs with Our 50 Free Banners Offer
- [Updated] Essential Visual Captures on Apple Systems (Limit 156 Characters)
- Eliminating the 'Package Unopenable' Error on Win11, 10 OSes
- Experts' Pick for the Most Cost-Effective Portable Chargers of 2024: In-Depth Testing and Analysis | ZDNet
- Experts' Top Picks for Affordable & Powerful Portable Batteries of 2024: In-Depth Analysis | ZDNET
- Exploring the Latest Innovations in Smart Home Technology: Dive Into Google Nest Learning Thermostat's Enhanced Capabilities, Technical Details, Cost Breakdown & Extra Insights | TechRadar
- Get Your Hands on the Powerful Jackery Explorer 1000 with a Whopping $250 Off This Black Friday, Exclusive ZDNET Scoop Inside
- How to Fake Snapchat Location without Jailbreak On Samsung Galaxy F04 | Dr.fone
- In 2024, Elevating Visuals The Shift From SDR to HDR in Editing
- In 2024, How to Add Divine Chant to Smartphone Notifications
- Tech's Elite Selection The Top 10 Video Recorders Online
- Top 5 Solar-Powered Outdoor Lights : Expert Review by TechRadar
- Top-Rated Portable Power Station Reviews : Comprehensive Guide by Tech Experts | ZDNet
- Unleash Ultimate Productivity with the Zendure SuperBase Pro 200 Cu Ft Tank: Expert Hands-On Test Results Revealed | Tech Innovation Today
- Updated In 2024, Navigating the Best FREE Browser-Based DAW Platforms for Enhanced Audio Creation - 2023 Edition
- Title: Comprehensive Guide to Setting Up and Using Passkeys on Windows 11 Devices
- Author: John
- Created at : 2024-12-21 16:31:08
- Updated at : 2024-12-26 06:53:27
- Link: https://techno-recovery.techidaily.com/comprehensive-guide-to-setting-up-and-using-passkeys-on-windows-11-devices/
- License: This work is licensed under CC BY-NC-SA 4.0.