
Efficiently Convert Your DVD Collection to Digital with Windows 11
Easy Steps for Swiftly Upgrading to Windows 11 with a Clean Slate Setup
If you have already installed Windows 10 on your computer, and you want to perform a clean install, you don’t necessarily have to go through the same steps as your first installation of Windows 10. If you don’t have Windows media such as a DVD, CD, or a USB flash drive with Windows 10 ISO files copied in it, and you don’t want to undergo such a excruciating procedure of creating and then reinstalling Windows 10 all over again, it is suggested that you choose [ Method Two: Perform a Reset of your PC](https://www.drivereasy.com/knowledge/how-to-do-a-clean-install-of-windows-10-quickly-and-easily/#method two) .
For most people, this is the go-to option since it is easy to follow and there is no need for additional tools.
The disadvantage of this method is that it leaves your computer and hard drives in their current state. If you want to repair your hard drive or change which drive you boot from, you can choose to follow instructions on [ Method One: Create Installation Media and Install windows 10 from Scratch](https://www.drivereasy.com/knowledge/how-to-do-a-clean-install-of-windows-10-quickly-and-easily/#method one) .
You can reinstall Windows 10 from scratch by using the product key that came with your PC. With the product key, you can download the free ISO files offered by Microsoft and then use the files to reinstall Windows 10. The information of how to download and create Windows 10 ISO files and then use it to perform a clean install of Windows 10 can be found inMethod One .
Method One: Create Installation Media and Install windows 10 from Scratch
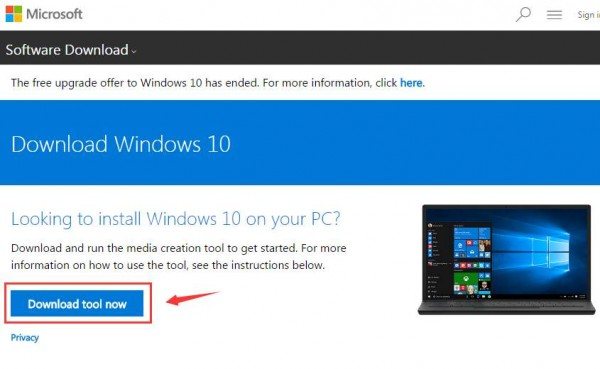
Note: You need to have your valid license key at hand just in case you run into an issue using the OEM key with a retail version of Windows. 1) Download MicrosoftMedia Creation Tool fromthis website here first.
Please be assured that Media Creation Tool is the official method for downloading ISOs for Windows 10. This tool will help you download the correct Windows 10 installation files for your system and help you create an installation DVD or flash drive.
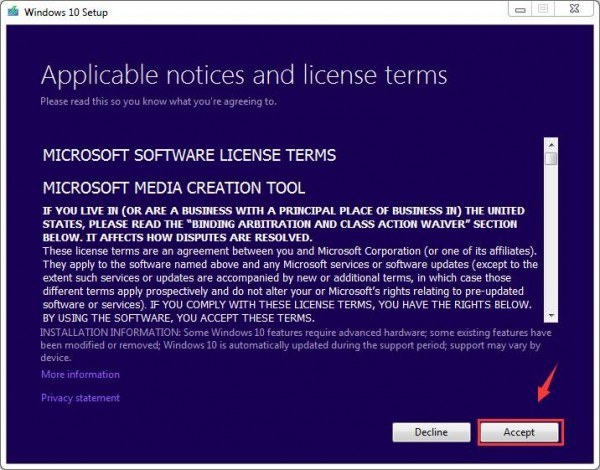
- After the download, double click the downloaded setup file to run the installation. ClickAccept to continue.
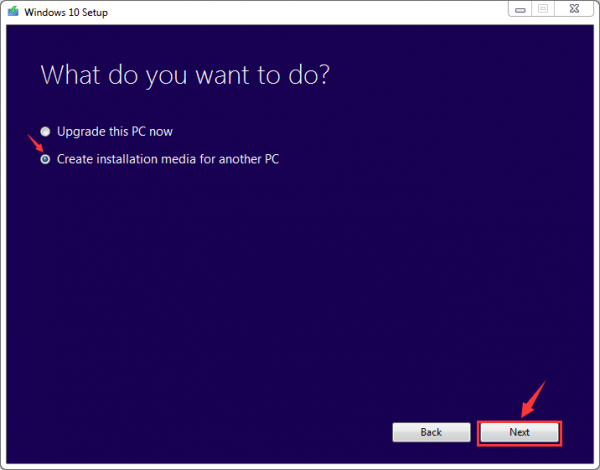
- Tick the optionCreate installation media for another PC , and then clickNext .
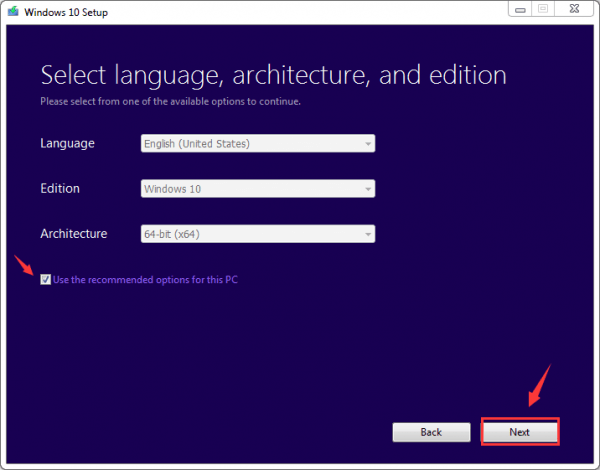
- Then you will be lead to a page where you need to select language, architecture and edition. If you are going to install it on a different PC, clear the check box before “Use the recommended options for this PC ” and fill in the information that you prefer and clickNext to continue.
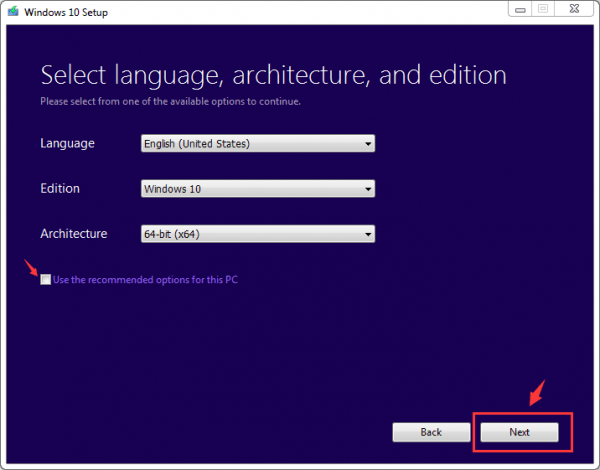
If you are going to use the installation media on the same PC that you create it, you can clickNext to go ahead.
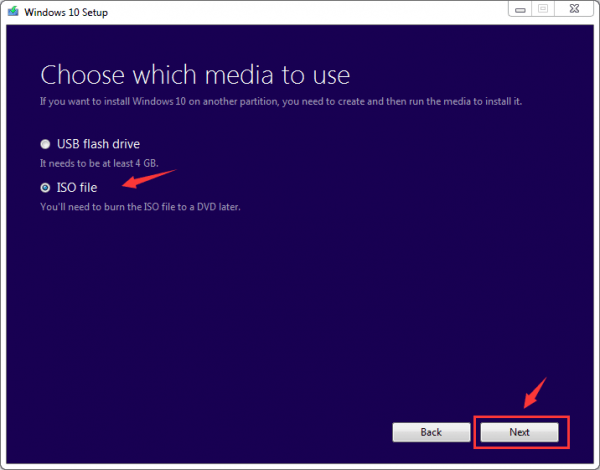
- Next, select whether you want the tool to create a bootableUSB flash drive with the installation media, or just create anISO file that can be used to burn to a DVD later. Select the option you want and clickNext .
Note : It should be made clear that if you choose USB flash drive option, you will need to provide a USB flash drive with at least 3 GB of space and there is nothing on it because the USB drive will be formatted during the process.
We are demonstrating by choosing ISO file but the general procedure is mostly the same.
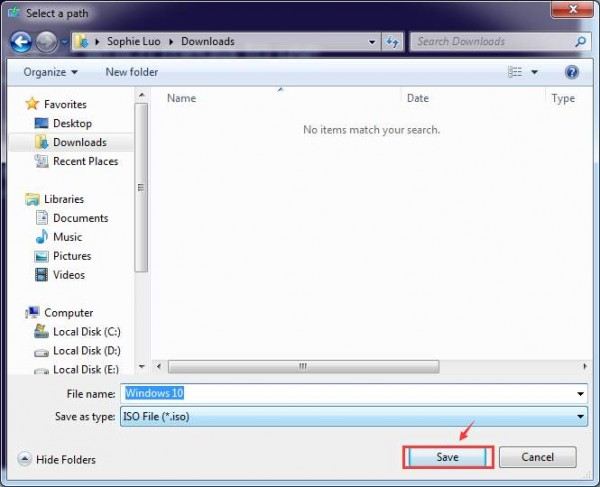
- Choose a place where you want to save the finished ISO file and chooseSave to continue. If you choose USB flash drive option, you should choose the right USB drive.
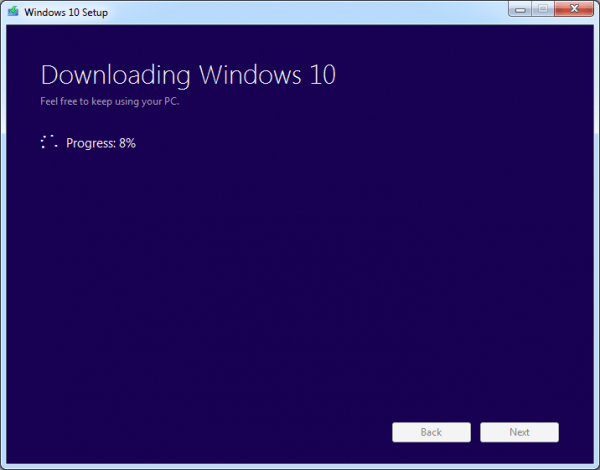
- It will take a while for Media Creation Tool to download the files and assemble your ISO.
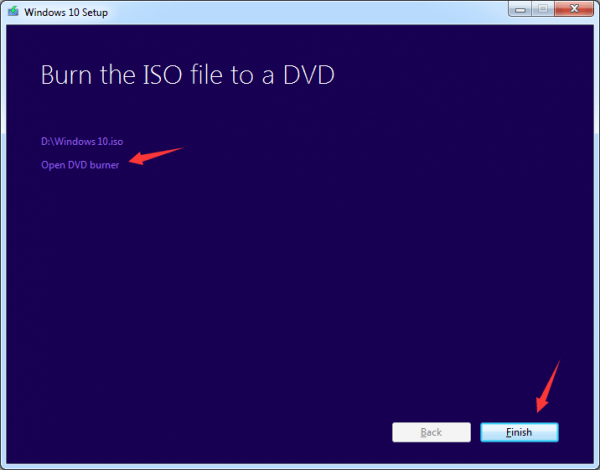
- When this process is finished, you could chooseOpen DVD Burner if you want to create a disc right now. Or you can just clickFinish if you want to make a disc later.
 9) With your USB drive or DVD inserted, restart your computer. Press a key forBoot Menu .
Note : The key to press for Boot Menu varies for different motherboards. Usually the boot screen will show you which key to press.
You can also read the manual for your motherboard to see what specific key to press forBoot Menu .
Usually speaking, Acer isF12/ F9/ Esc , ASUS isF8/ Esc , Dell isF12 , HP isEsc/ F9 , Lenovo isF12/ F8/ F10 etc.
You can also go toUse a device option in theAdvanced startup options .
Here is how you could do it.
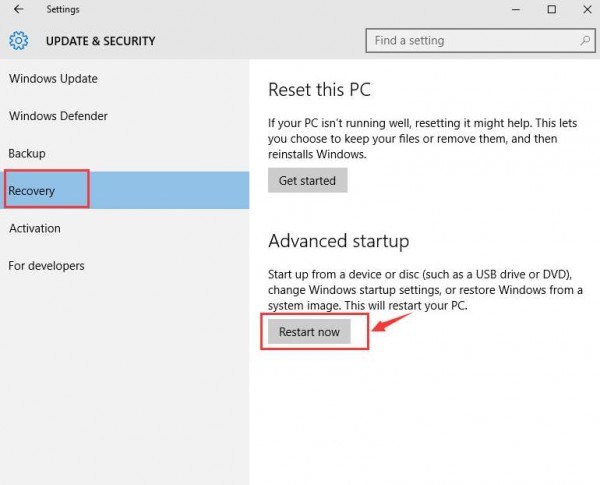
a) Follow the pathStart> Settings> Update & security> Recovery> Restart now button underAdvanced startup .
b) Then clickTroubleshoot> Advanced options and you will see this page.
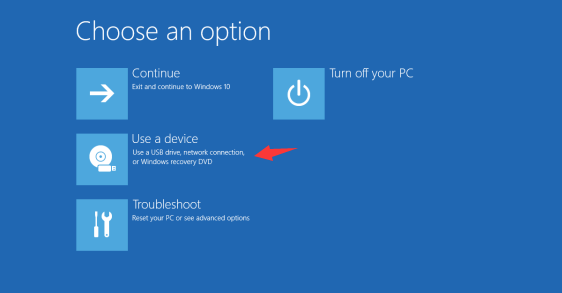
Note : Some users might not be able to see the Use a device option here. But we find that if the USB flash drive with the ISO files or the DVD disc is connected to the computer, you can boot from the device by clickingContinue button.
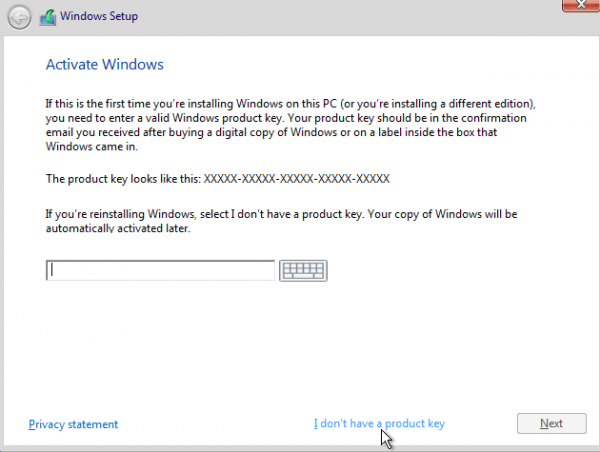
- You will see the activation screen next. If you have installed Windows 10 on this computer, please chooseI don’t have a product key . If you have never installed Windows 10 on this computer before, please type in your valid license key, which could be the key for Windows 7, Windows 8 or Windows 8.1.
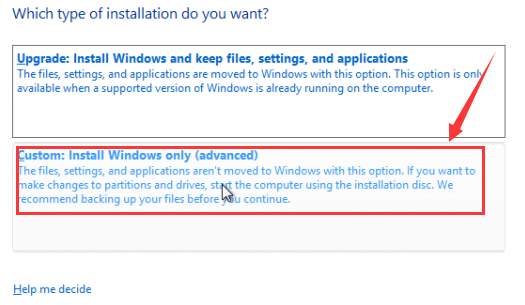
- Continue the clean install process normally until you seeWhich type of installation do you want? ChooseCustom option to ensure that you are perform a clean install instead of and upgrade.
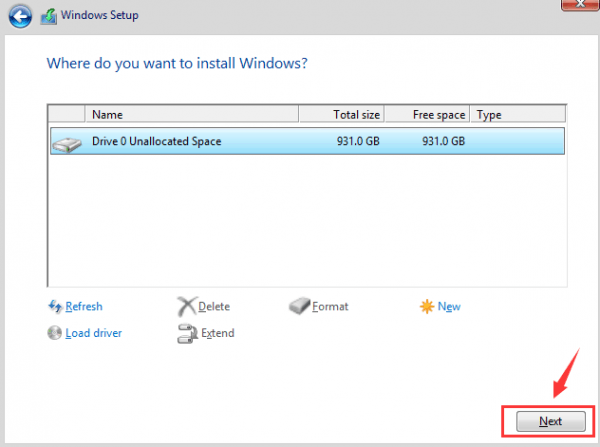
- Choose which partition you would like to install your system drive.
If you have only one drive, just clickNext to continue.
If you have multiple drives, choose the primary partition and clickNext .
Then all you need to do is to wait with patience for the installation to end. Some might encounter a few reboots during the process.
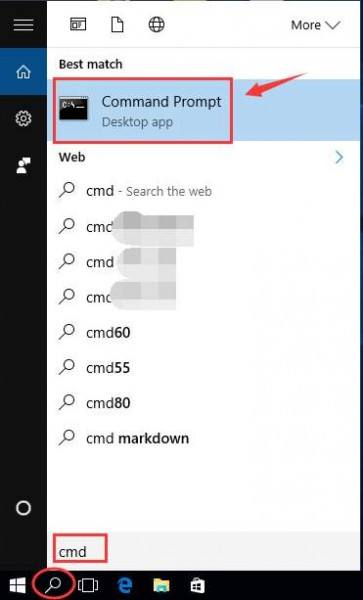
Usually, your computer will be activated automatically once you have access to the Internet. If the activation is not happening, you can force an activation by running the following command.
a) Typecmd in the search box, then chooseCommand Prompt from the list of choice.
b) Type in the commandslmgr.vbs /ato and pressEnter key.
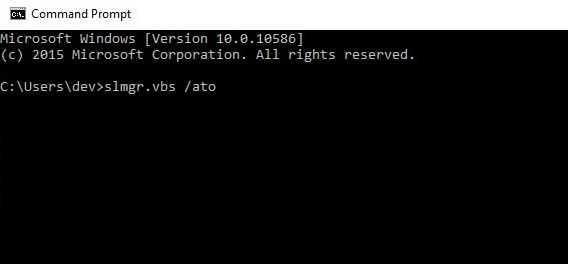
c) You might need to try this command a couple of times. If you see any errors, please reboot your computer and run this command again. Or you can just wait for Microsoft to help you activate your system automatically.
Method Two: Perform a Reset of your PC
Warning : A reset on Windows 10 will help you reinstall Windows 10 and removesALL your personal files. The drivers, the applications, the personal changes that you made to settings, and the applications installed by your computer manufacturer will be removed as well. However, if your computer came with Windows 10, apps from your computer manufacturer will be reinstalled.
Therefore, it is strongly suggested that youback up your important files and applications before your do a reset on your computer. For more information for how to backup in Windows 10, please refer tothis post here .
Note: This method is adopted when you can boot into your Windows normally. If you cannot boot into your desktop, please seethis article here to do a reset from a hard reboot.
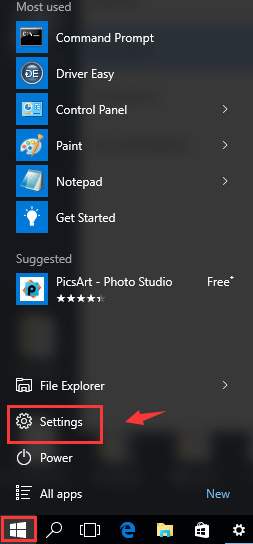
- Click theStart button, and then chooseSettings that comes up.
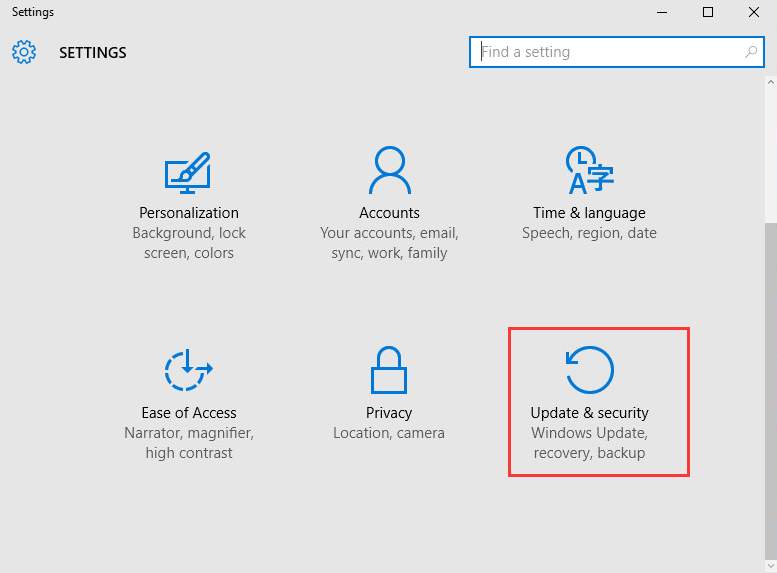
- Click on theUpdate & security icon.
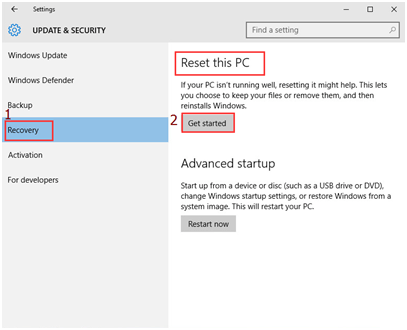
- On the left panel, chooseRecovery , and then chooseGet started option underReset this PC .
- ChooseRemove everything to perform aReset .

- Then you will be lead to the page below. Please choose accordingly.
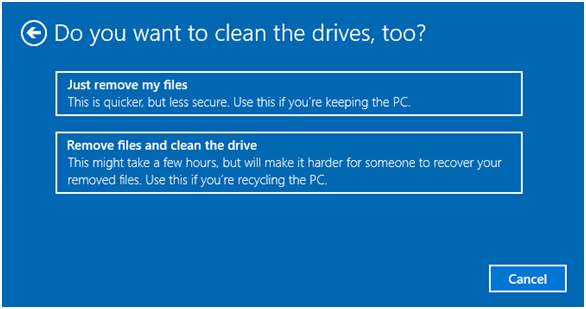
Note: Just remove my files will performs a quick format and it will not take long. Your files might be recoverable by someone else since they are only marked as deleted. It is suggested that you choose this option if you are keeping your computer.
Remove files and clean the drive performs a secure erase to fully clean your drive and your files cannot be recovered easily. It could take hours to finish. It is suggested that you choose this option if you are recycling or selling your computer.
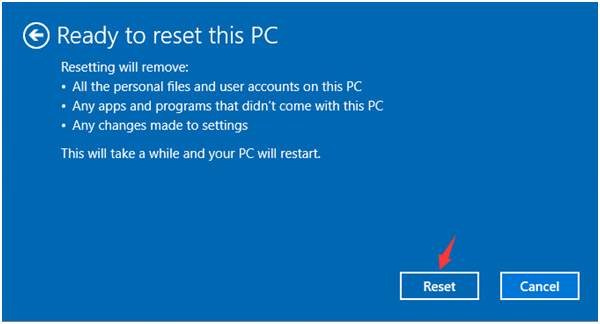
- PressReset to start the reset process.
- Wait for a while for the process to begin. When finished, you will need to set up your personal preference before logging onto your desktop.
Also read:
- [New] Premier Choices 8 Linux Editing Tools
- [New] Streaming Stardom Unraveling Jake Paul's YouTube Rise
- [Updated] In 2024, GamEye Expertise A Compreeher Guide to Quality Capture
- 「フリー無料:Movaviを使ったオンラインMPEG WMA再生可能化ツール」
- Deciding Between Powerhouses: In-Depth Analysis of the M1 Vs. M2 iPad Pro for Tech Enthusiasts
- HDDからSSDへのパフォーマンス向上処理:データ損失ゼロでミラーリング手順
- Hurry! Limited-Time Promo: Buy a Favorite Nomad Case & Receive Another for Free – Shop Now at ZDNet
- KineMaster Android An In-Depth Gaming Guide Review for 2024
- Mastering the Art of Soundtrack Posts A Copyright Primer for Insta for 2024
- May 2024'S Elite AT&T Cell Phone Bargains Featured
- New The Ultimate Selection of Six Compelling Chrome Talk Transformers to Experience - MovieMagicSuite for 2024
- The Hierarchy of 'Royal Match': Understanding Its Levels
- Top 10 Unbeatable Savings on Apple Watches in July 2024 - Exclusive Offers! Tech Guide
- Top 5 Mobile Gaming Powerhouses: 2022'S Ultimate List | TechRadar
- Top Kid-Friendly Mobile Devices: A Comprehensive Guide | TechRadar
- Unlocking the Secrets Quickly Change Your Character's Vocal Tone (PUBG) for 2024
- What to Expect From Apple's Newest Launch: The MacBook Pro (M3) - Release Info, Cost Analysis & Feature Guide
- Title: Efficiently Convert Your DVD Collection to Digital with Windows 11
- Author: John
- Created at : 2025-02-05 18:55:56
- Updated at : 2025-02-12 01:08:57
- Link: https://techno-recovery.techidaily.com/efficiently-convert-your-dvd-collection-to-digital-with-windows-11/
- License: This work is licensed under CC BY-NC-SA 4.0.