How to Resolve a Non-Detected New External Storage Device on Your PC - A Step-by-Step Guide
How to Resolve a Non-Detected New External Storage Device on Your PC - A Step-by-Step Guide
Quick Links
Key Takeaways
- Hard drives you purchase aren’t usually preformatted, so Windows waits for you to decide what to do with the drive.
- Open the Disk Management tool, identify your new (unformatted) drive, then right-click it and select “Initialize.”
- After you initialize the drive, you must format it before you can store anything on it. Use NTFS if the drive will only be used in a Windows PC.
You installed a new hard drive in your computer and, to your dismay, it’s nowhere to be found. Don’t panic, you just need to give Windows a little nudge to bring it online.
The Most Common Reason Your Disk Is Missing
You grabbed a nice big hard disk on sale, you cracked open your computer case, plugged the drive into the motherboard and power supply with the appropriate cables (no? better double check that before you keep reading), and when you booted your computer back up the new hard drive was nowhere to be found.
Or maybe you followed along with our external hard drive tutorial and can’t figure out why, even though you can hear the disk whirring away in the enclosure, you don’t see the disk in Windows. What’s the deal?
Unlike the hard drive that ships with an off-the-shelf computer or external drive, extra hard drives you purchase aren’t always shipped formatted and ready to use. Instead, they’re in a totally blank state—the idea is that the end user will do what they wish with the drive, so there is no benefit to preformatting or otherwise changing the drive at the factory.
As such, when you put the drive in your system, Windows simply waits for you to decide what to do with the drive instead of automatically formatting and adding it to the drive list. If you’ve never added a hard drive to your computer before, however, it can be pretty disconcerting when it appears like the drive is missing (or, worse, dead). Have no fear, though! It’s easy to bring your hard drive out of hiding.
How to Bring Your Missing Drive Online
Assuming that the hard drive is installed properly, and is not, (by some horrible dumb luck) defective out of the gate, bringing it online is a very simple process. To do so, you first need to pull up the Windows Disk Management tool.
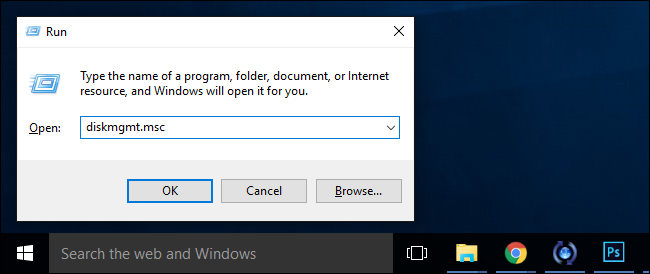
Press Windows+R on your keyboard to launch the Run dialog box. Type diskmgmt.msc into the box and press Enter.
Before we proceed, we want to appropriately warn you: Do not play around in Disk Management. Although the task we’re about to perform is very straightforward and simple to do, if you muck around with this tool you will have a very bad time. Double check every step. Make sure you’re selecting the correct disk, or you can lose lots of data.
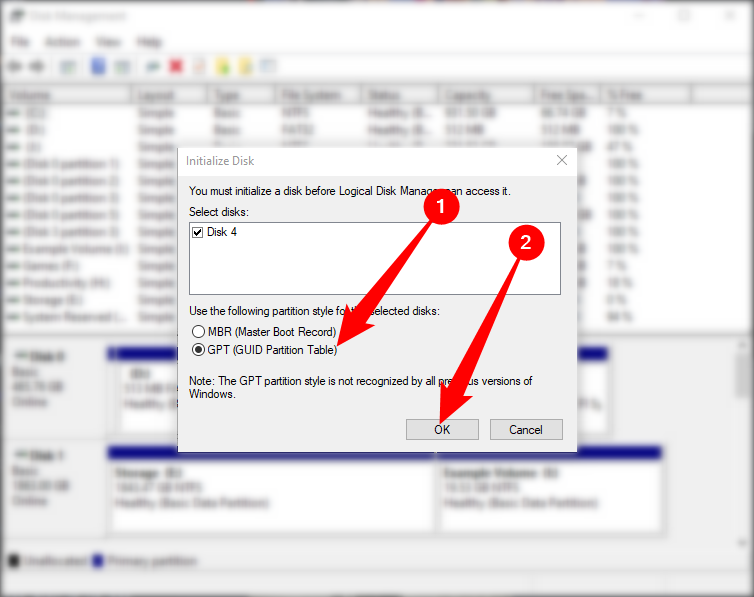
Disk Management will likely detect that you have a new drive and prompt you to initialize it. You should pick GPT if this option appears, then click “OK.”
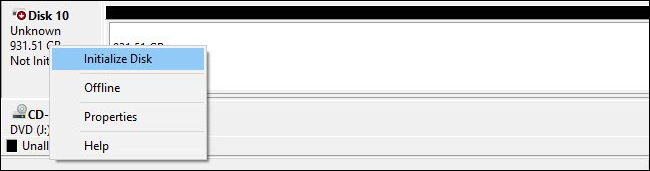
If it doesn’t show up, you just need to initialize it manually. In Disk Management, scroll down through the list of disks in the bottom pane. These disks will be labeled “Disk 1” through however many disks you have. Windows assigns a number to all hard disks, solid state disks, USB drives, and card readers, so don’t be surprised if you have to scroll down a bit—in our case the new drive was “Disk 10” as seen below.
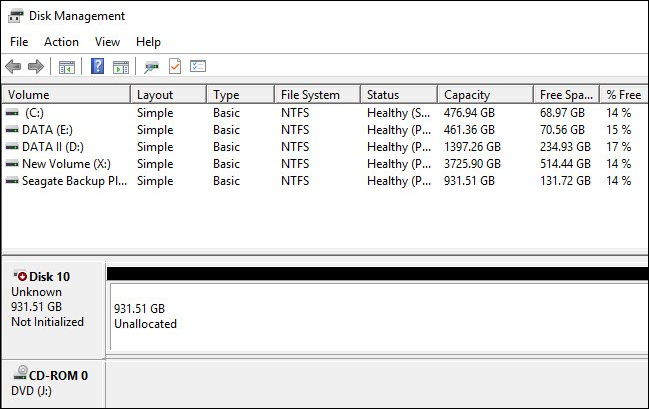
There are four bits of information here that indicate we’re looking at the right disk. First, the disk is marked as “unknown” and “Not initialized” on the left, which a brand-new disk introduced to the system would be flagged as. Second, the drive size matches the size of the drive we just installed (around 1 TB), and the drive is flagged as unallocated, which means none of the hard drive space has been formatted or assigned a partition.
Right click on the name portion of the disk entry, where it says “Disk [#]“, and select “Initialize Disk” from the right-click context menu.
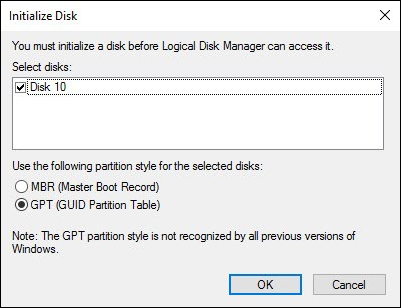
In the first step of the initilization process, you’ll be prompted to choose whether you want to use a Master Boot Record (MBR) or a GUID Partition Table (GPT) for the partition style of your disk. If you want to do some in depth reading before making a choice, you can check out our explainer here . In short, unless you have a pressing reason to use MBR, use GPT instead—it’s newer, more efficient, and offers more robust protection against corruptions of the boot record.
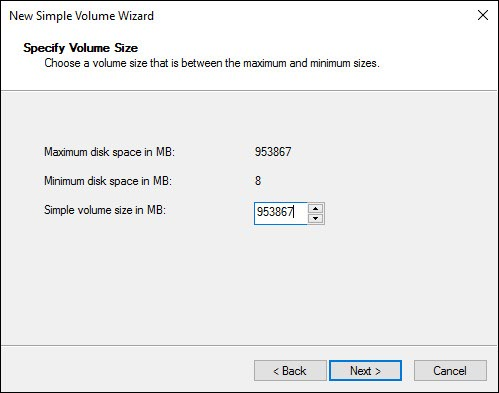
Click “OK” and you’ll be returned to the main Disk Management window. There you’ll find that your disk is now labeled “Basic” and “Online” on the left, but the contents are still “unallocated”. Right click on the striped box presenting the unallocated drive space. Select “New Simple Volume”.

This will launch the New Simple Volume Wizard to guide you through the process of setting up the disk. In the first step, select how much space you want to include in the volume. By default the number is the full amount of available disk space–unless you’re planning on reserving space for additional partitions, there’s no reason to change this. Click “Next”.
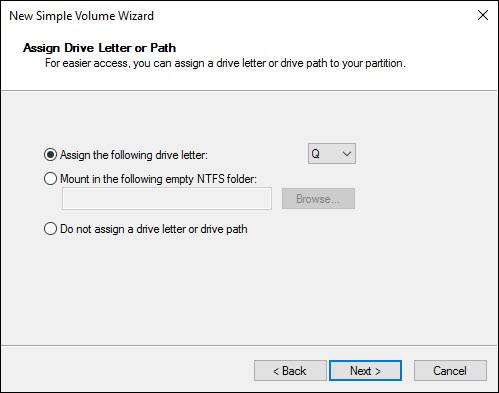
In the second step, assign a drive letter. The default is probably fine.
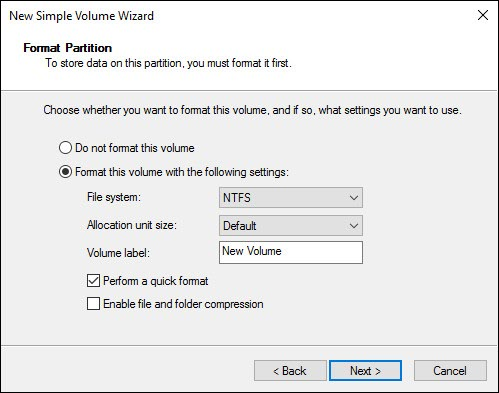
Finally, format the volume. If you’re using the volume for routine computing tasks (storing photos, video games, etc.) there’s no real need to deviate from the default NTFS file system and settings. Curious about the differences between file systems and why you might use the different options? We’ve got you covered . Give your volume a name, click “Next”, and wait for the format process to finish.
When the process is complete, you’ll see your new drive–allocated, formatted, and ready for action–in the Disk Management disk list.

You can now use the disk like any other on your system for media storage, games, and other purposes.
Also read:
- [New] Integrate YouTube Content Into Google Slides Effectively
- [Updated] An Expert's Guide to Accumulating Mass TikTok Videos Effortlessly for 2024
- [Updated] Radial Magic Transforming Ordinary Photos Into Art
- Best Flashlights You Need : Professional Advice and Choices | Gadget Guide, ZDNet
- Cost-Effective Power Solutions for Adventurers: The Top Rated, Economical Station Reviewed by ZDNET
- Debunking Rumors: Diablo Immortal's Upcoming Arrival on PC Platforms
- Discover the Latest Tools to Spot ChatGPT in Your Classroom or Workplace
- Grok Ventures Secures Majority Ownership in AGL by Acquiring 11% Share, Thwarting De-Merge Strategy
- In 2024, Will iSpoofer update On Lenovo ThinkPhone | Dr.fone
- Must Haves: Buying a Refurbished Laptop Guide
- Navigating Prime Day Deals: Securing the Budget-Friendly Smart Plug for Just $3.49 | Tech Insights with ZDNet
- Navigating the Uses of ChatGPT as a Student: What to Watch Out For
- Resolving the Issue: Reactivating Your Device's Disabled Wi-Fi Feature
- Tired of Tesla's Powerwall? Explore an Alternative with Anker's Solix X1 Battery Pack - ZDNet
- Top Rated Portable Solar Power Banks - Expert Reviews & Comparisons
- Top-Rated High-Intensity LED Torches : Professional Picks | TechRadar
- Top-Rated LED Flashlight Picks - Comprehensive Reviews by Tech Experts | ZDNet
- Title: How to Resolve a Non-Detected New External Storage Device on Your PC - A Step-by-Step Guide
- Author: John
- Created at : 2024-12-20 04:42:48
- Updated at : 2024-12-26 07:56:13
- Link: https://techno-recovery.techidaily.com/how-to-resolve-a-non-detected-new-external-storage-device-on-your-pc-a-step-by-step-guide/
- License: This work is licensed under CC BY-NC-SA 4.0.