
Mastering Display Settings in Windows 11: Easy Fix for Changing Screen Resolution
Easy Methods for Disabling Your Windows 10 Lock Screen Instantly
 Lock screen, first saw in Windows 8, is originally only designed for touchscreens. But Windows 10 keeps this feature, even though it seems rather useless, considering that not as many Windows 10 PCs are with touchscreens as Windows 8. In this post, we will be introducing the easiest way to disable the lock screen on your Windows 10 PC. Before we begin, we need to state clear that there are actually two kinds of lock screens on Windows 10: when you turn on your computer, you will see the first lock screen. When you unlock your computer from sleep or lock, you will see the second lock screen. And we are to turn off the second lock screen here. When this is done, you don’t need to manually unlock your PC when waking from sleep. 1) First, go to yourThis PC. Then follow the path:C > Windows > SystemApps.
 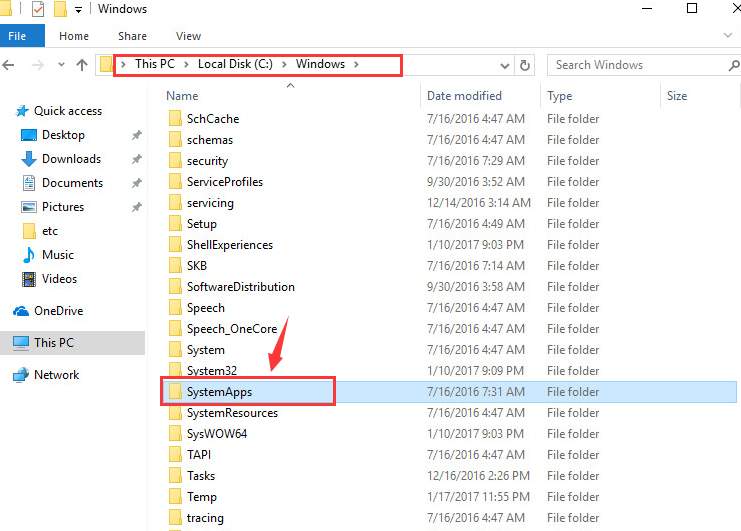 2) Then go intoSystemApps folder, locate Microsoft.LockApp_cw5n1h2txyewy folder. Right click this folder and chooseRename.
 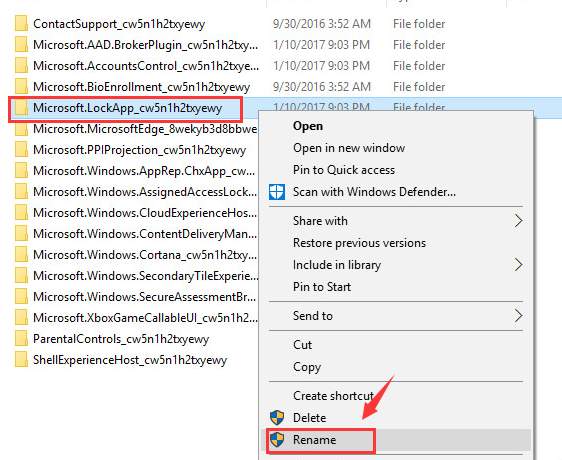 3) We are not changing the name here, just adding .bakto the end of it and then hitEnter.
 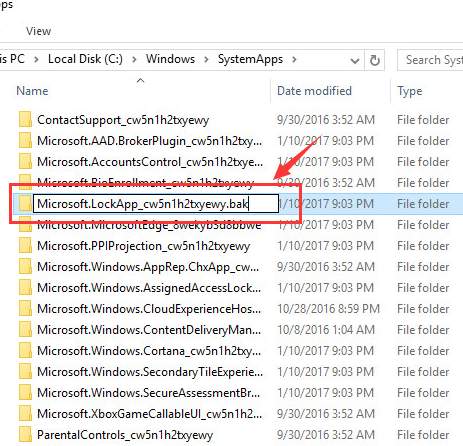 If you want to get your lock screen back, just delete the**.bakfrom the name of this folder. If you have a desktop PC and do not want to type in password every time you wake your PC from sleep mode, here is an alternative for you. Please note that the following instructions shut off your lock screen as well as the log-in screen, meaning that you don’t need to type in password to use your computer. So, please choose this method at your own peril. 1) PressWindows keyandRat the same time, then type innetplwiz**. Make sure you have made no typo and then hitEnter.
 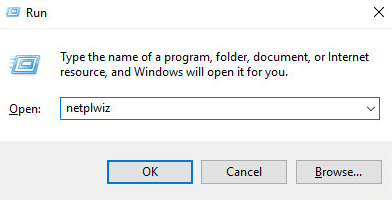 2) First, choose the account in theUser for this computerfield; second, un-tick the box forUsers must enter a users name and password to use this computer.
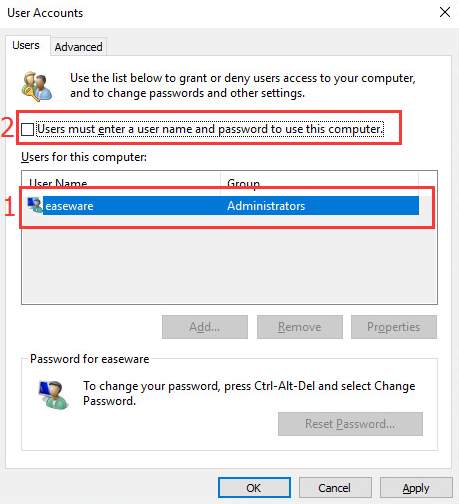 3) ClickApply.
 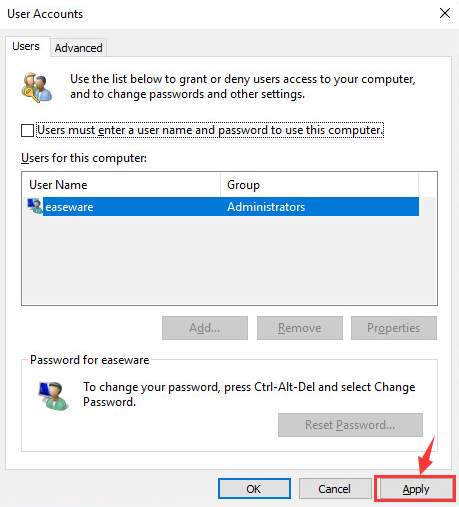 4) Type in your password in both of the password fields. Then clickOKto continue.
 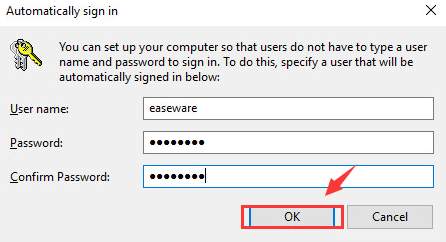 5) Now clickOK.
 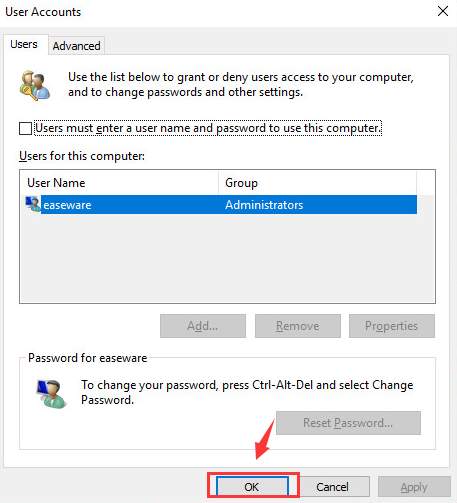 6) You can try to restart your computer now to see if the lock screen is off already.
Also read:
- [FIXED] High CPU Usage by WUDFHost.exe in Windows 10
- [New] Coordinating Multiple Channels on One Screen
- [Updated] Building an Intriguing Vlog Conversation Guide
- [Updated] Finn's Fiscal Flow Income Insights From YouTube Icon
- Beyond Social Networking: Diving Into Facebook's Metaverse Concept
- Enhancing Your Facebook Strategy: Attaching a Pinterest Section to Your Profile
- Explore 6 Prime Locations for Viewing Your Most-Loved Music Visuals on the Web
- Fixing Blue Screen of Death: Resolving the STOP 0X0000007B BSOD Issue
- Google Chrome Stops Working? Here's How You Can Resolve It
- Recover Lost Steam.dll for Seamless Gaming Experience Today
- Streamlining Film Shoots A Beginner's Guide for 2024
- Supercharge the AMD Ryzen Eight with Hyper Turbo Techniques - Gain an Extra 250 MHz & Boost Geekbench Performance by Over a Quarter
- Tech Giant Intel Postpones Anticipated Innovation Conference To 2025: Struggling With Job Reductions and Economic Unpredictability
- The Ultimate List of Best Visual Voicemail Software - 2024 Rankings
- Troubleshooting Steps for Resolving Kernel Page Fault Issues
- Title: Mastering Display Settings in Windows 11: Easy Fix for Changing Screen Resolution
- Author: John
- Created at : 2025-03-01 00:43:20
- Updated at : 2025-03-02 21:39:17
- Link: https://techno-recovery.techidaily.com/mastering-display-settings-in-windows-11-easy-fix-for-changing-screen-resolution/
- License: This work is licensed under CC BY-NC-SA 4.0.