PUBG MOBILE: Everything You Need to Know
Troubleshooting: PC Starts without Screen Output – Solved
Your screen remains black after turning on the PC? This is very frustrating, and you’re certainly not alone. Many Windows users are reporting this issue. But the good news is that you can fix it. Here’re 6 fixes to try.
Fixes to try
- Fix 1: Force restart your computer
- Fix 2: Check if your monitor is working
- Fix 3: Reconnect your monitor to your computer
- Fix 4: Disconnect your peripherals
- Fix 5: Reinstall your RAM
- Fix 6: Reset your BIOS settings to default
Though it might look complicated at first glance, just work your way down the list, step-by-step, and we’ll try to get you back on track.
Fix 1: Force restart your computer
If all you see is a black screen after pressing the power button, try pressing the power button for 10 seconds to force shut down your PC, then turn it on. Doing this repeatedly for three times, the Windows Startup repair should launch automatically.
If nothing happens after turning your PC on and off a coupon of times, that could indicate hardware problems. Skip to Fix 2 and see how to fix them.
If you boot into Automatic Repair, select Troubleshoot > Advanced options > Startup settings > Restart >Safe Mode with Networking , then try running a system scan with Fortect to detect broken or damaged system files and repair them.
Fix 2: Check if your monitor is working
If your computer starts but displays nothing, you should check is if your monitor is working properly.
Check thepower light of your monitor to verify that it’s turned on.
If your monitor won’t turn on , unplug thepower adapter of your monitor, and then plug it back into the power outlet. If the problem still exists, you need to bring your monitor to the repair shop.
If your monitor works fine , move on to the fix below.
Fix 3: Reconnect your monitor to your computer
A poor connection between your monitor and your computer might also be the cause of your problem. In this case, reconnecting the two devices is very likely the solution to your problem. Here is how to do it:
1) Press and hold thepower button until your computer turns off.
2) Unplug thevideo cable which connects your monitor to the computer.
3) Check theport connectors on your computer and on the monitor.
If any connector on your device is bent or damaged, you’ll need to take the device to a repair shop.
4) Check to see if yourvideo cable is damaged. If the video cable is fine, reconnect your computer to your monitor. Or, if you haveanother video cable available, try connecting the two devices using the new cable.
5) Try turning on your computer to see if it can boot normally.
If your computer fails again, read on and check the fix below.
Fix 4: Disconnect your peripherals
Sometimes, certain peripherals connected to your computer may also cause the black screen issue. Try disconnecting all your peripherals to see if that’s the core problem. Here is how to do it:
1) Press and hold thepower button until your computer turns off.
2) Disconnect allperipherals (your printer, scanner, mouse, etc.).
3) Try turning on your computer again.
If your computer boots correctly, that means that one of the peripherals you removed is causing your problem. You shouldreinstall each device back into your computer and test them each time. Then, you’ll find the specific device that causes your problem. (Replace the device once you’ve identified it. Or, consult the manufacturer of the device for assistance. )
If your computer still can’t boot correctly, try the fix below.
Fix 5: Reinstall your RAM
A poor connection between your RAM and motherboard can also cause this problem. In this case, you need to reinstall your RAM. Here is how:
1) Press and hold thepower button until your computer turns off.
2) Disconnect theAC power cord from the power supply, and then open your computer case.
This process will vary depending on different types of computers. If you don’t know how to do it, consult your computer’s documentation or seek professional help.
3) On your motherboard, removeyour RAM from the memory slot.
RAM looks like this:
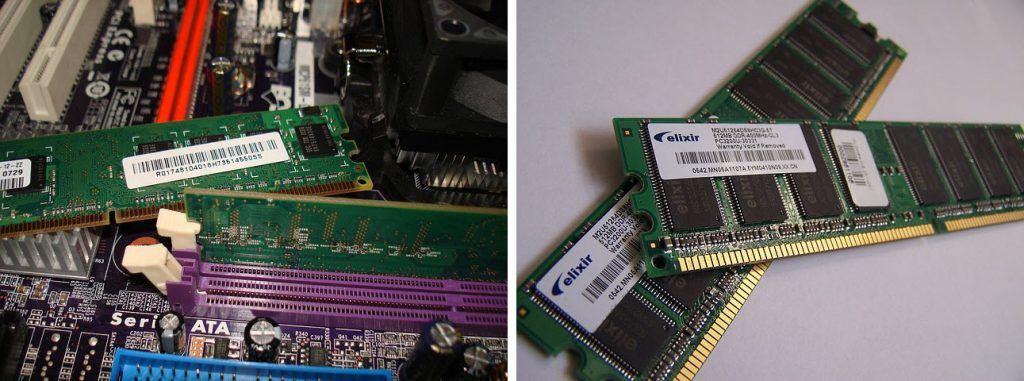
4) Putyour RAM back into the slot.
5) Connect theAC power cord to the power supply, and then turn on your computer.
If your computer still can’t boot properly, don’t worry. Check the fix below.
Fix 6: Reset your BIOS settings to default
Improper BIOS settings can also cause your PC to boot into a black screen. To see if that’s the problem for you, you should reset your BIOS to factory settings. Here is how to do it:
1) Press and hold thepower button until your computer turns off.
2) Disconnect theAC power cord from the power supply, and then open your computer case.
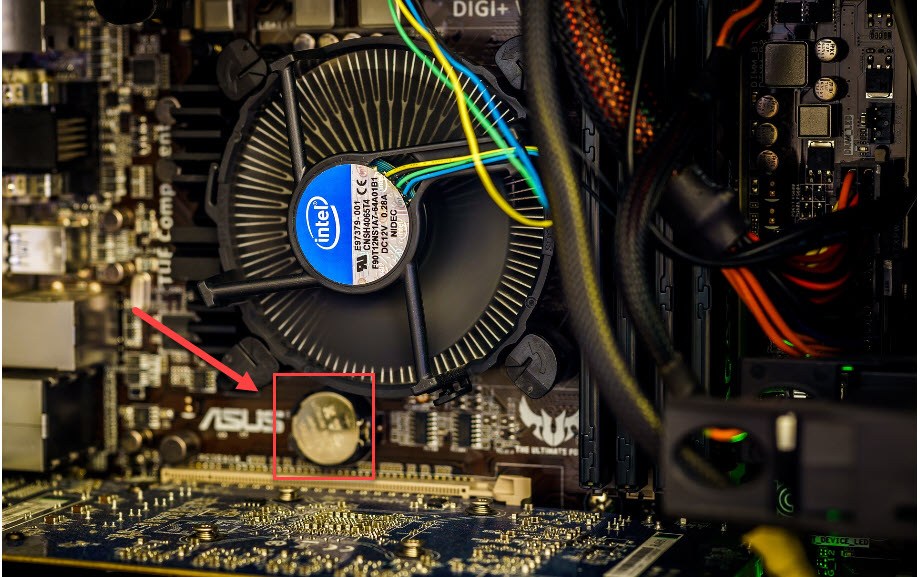
3) On your motherboard, remove yourCMOS battery with your fingernail or a non-conductive screwdriver.
The CMOS battery looks like this
4) Wait for 5 minutes, and then reinstall yourCMOS battery .
5) Connect theAC power cord to the power supply, and then turn on your computer to see if your problem persists.
Bonus Tip: Check for corrupt system files with Forect
There are many factors that can cause Windows booting failures, like corrupted or missing Windows system files, registry, and more.
Fortect is a professional Windows repair tool that can scan your system’s overall status, diagnose your system configuration, identify faulty system files, and repair them automatically. It gives you entirely fresh system components with just one click, so you don’t have to reinstall Windows and all your programs, and you don’t lose any personal data or settings. ( Read Fortect Trustpilot reviews .)

Here’s how to use Fortect to check for broken system components in just one click:
1)Download and install Fortect.
Open Fortect and run a free scan on your PC. Wait for Fortect to scan your PC. This may take a few minutes and you’ll get a detailed report of your PC status after this.
You can review a summary of the issues detected after the scan is finished. Click START REPAIR to start the repair process. This requires the full version – which comes with a60-day Money-Back Guarantee .

The Pro version of Fortect comes with 24/7 technical support. If you need any assistance, please contact Fortect support:
Email: support@fortect.com
Hopefully, this article helped! Please let me know which method helped you, or if you have a better idea on how to fix this issue. I would love your thoughts!
Also read:
- [Updated] In 2024, Boredom's Ender The Ultimate List of Jovial YouTube Content
- 2024 Approved Top-Quality SD Card for Sony Alpha 7S II
- 4 Ways to Fix Android Blue Screen of Death On Tecno Spark 20 Pro | Dr.fone
- Cat5 versus Cat6 Cabling - What Sets Them Apart?
- Easy Steps: Activate/Deactivate Your Computer’s Touch Keyboard on Windows 10 Systems
- Essential Strategies to Recover or Restore Missing WPCPAT.DLL Components
- Jaunt VR Uncovered A Comprehensive Look
- Speech Analysis and Conversion - It's Free
- Step-by-Step Guide: Linking Your Amazon Fire TV Stick with WiFi Through a Smartphone's Tethered Connection
- Step-by-Step Tutorial: Locating Personal Telephone Information Digitally
- Title: PUBG MOBILE: Everything You Need to Know
- Author: John
- Created at : 2025-02-26 19:35:03
- Updated at : 2025-03-02 19:56:52
- Link: https://techno-recovery.techidaily.com/pubg-mobile-everything-you-need-to-know/
- License: This work is licensed under CC BY-NC-SA 4.0.