
Step-by-Step Guide: Creating Your Own Digital Collectible (NFT)
Step-by-Step Guide: Creating Your Own Digital Collectible (NFT)
Quick Links
- How to Create an NFT
- Step 1: Create a Piece of Art
- Step 2: Get a Crypto Wallet and Add Some Crypto
- Step 3: Pick a Platform to Sell On
- Step 4: Minting Your NFT
- Step 5: Selling an NFT
You can’t escape the NFT craze right now: everybody is talking about these digital assets, or even going so far as putting out their own. As a result, you may find yourself curious about how to get in on the action. Here’s how to make your own.
How to Create an NFT
We’ve put together this short guide on how to make an NFT in just a few steps. However, because it’s relatively brief, we’re assuming you already know some basics, like what NFTs are and how they relate to cryptocurrency .
Related: What Are NFTs? Meet Crypto’s Digital Collectibles
We’re also assuming that you’re aware of criticisms of and problem with NFTs . For example, as an investment, they’re incredibly volatile. Some people are making millions with crypto, but plenty of others have seen their portfolios plummet in value. The art itself isn’t stored on the blockchain .
We’re not recommending you create or buy NFTs. If you get involved with NFTs, know that there’s no such thing as a sure bet when dealing with anything crypto.
Step 1: Create a Piece of Art
With disclaimers out of the way, let’s take a look at how you can create an NFT and bring it to market. The first step is to have or make something that can be turned into a non-fungible token. There are a lot of options here, from video game items to memes, but for the purpose of this guide we’ll assume we’re working with digital art.
In this case, the first step is to create one. We’re not artists: This part is up to you. In the end, though, it doesn’t really matter what you want to turn into an asset, as long as it can be fit into some kind of digital format—PNG seems to be the most popular for visual art—you’re set for the next step.
Step 2: Get a Crypto Wallet and Add Some Crypto
The next step is also quite brief: you need to make sure you have a crypto wallet and load it up with the currency your platform’s blockchain uses—more on that later. The only way to play in the world of crypto is to have a wallet and to have a few bucks in it, so you can’t avoid this step.
Related: What Is a Crypto Wallet?
We have a guide on what a crypto wallet is and how they work, as well as one where we explain how you can buy bitcoin and other cryptocurrencies. The reason you need to have a wallet is to be able to receive funds, while you’ll need to buy some crypto of your own so you can pay any fees associated with putting an NFT up for sale.
Note that you can’t just use any wallet, though, as not all wallets play nice with all platforms, so take a close look at the next step before making any commitments.
Step 3: Pick a Platform to Sell On
This will be the most involved step: You need to pick where to sell your NFT. This can be a tricky choice, as different platforms charge different fees, let you set different terms, and may even specialize in different types of NFTs. Most importantly, they can also offer different blockchains to place your NFT on, which can affect security and usability for different people.
Related: What Is a “Blockchain”?
Going over all these differences in a single article is simply impossible. Instead, we’ll touch on the two biggest platforms, OpenSea and Rarible , and how they handle sales. Both of these are popular options to choose from. If you don’t like either of these options, though, there are plenty more to choose from. At the start of 2022, new ones are popping up almost every day.
Among the things you should keep in mind when choosing a platform are the legal side of things: some platforms will present you with a contract where you gain the copyright along with the NFT, with others it stays with the original maker. Another issue is which blockchain you want your NFT to be on.
Step 3A: Pick a Blockchain
Besides their size, the other reason we’re using these two platforms as examples is because they support more than one type of blockchain. Practically all marketplaces will offer Ethereum first and foremost—though you should take care not to confuse Ethereum the blockchain with its associated cryptocurrency Ether, which is confusingly also called Ethereum by some.
However, for any number of reasons, you may want to step over to another blockchain, in which case OpenSea and Rarible may be good options. OpenSea lets you use Ethereum, Polygon and Klaytn , while Rarible features Ethereum and Flow .
Related: What Are Ethereum (ETH) Gas Fees?
Each of these other blockchains has its own advantages and disadvantages over Ethereum. Usually—not always—their main advantage is that they’ll be cheaper to get into than their main competitor. This is because Ethereum requires you to buy something called “gas” in each and every transaction. For practical purposes, it’s best to think of it as a transaction fee, though it’s actually a little more complicated, as we explain in our guide to Ethereum gas .
Step 4: Minting Your NFT
Assuming you’ve picked the platform and blockchain that you think is best for your NFT, it’s time to upload your NFT to your wallet and get it ready for sale—again, the wallet you’re using may change depending on the platform you pick.
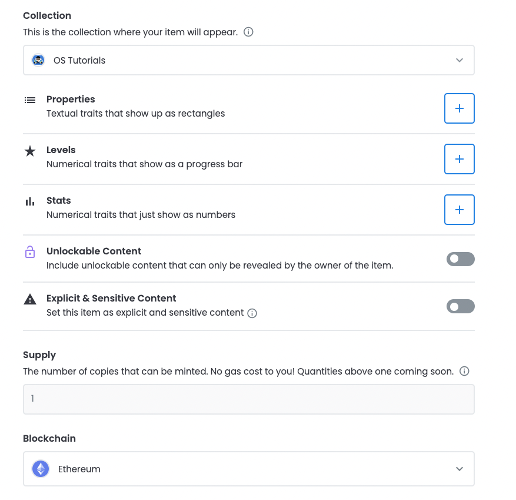
Uploading an NFT to the blockchain is known as “minting,” and it’s a pretty simple step overall. Rarible and OpenSea both have roughly the same process here. Following the instructions on your NFT marketplace’s website, you will upload your NFT into your wallet, add details like the description and a number of others—and then that’s pretty much it.
As you’ll see, there are a lot of things you can add to your NFT to make it more attractive, like adding levels or leaving parts of it locked until it’s been purchased. It’s an interesting way to reel curious buyers in.
Step 5: Selling an NFT
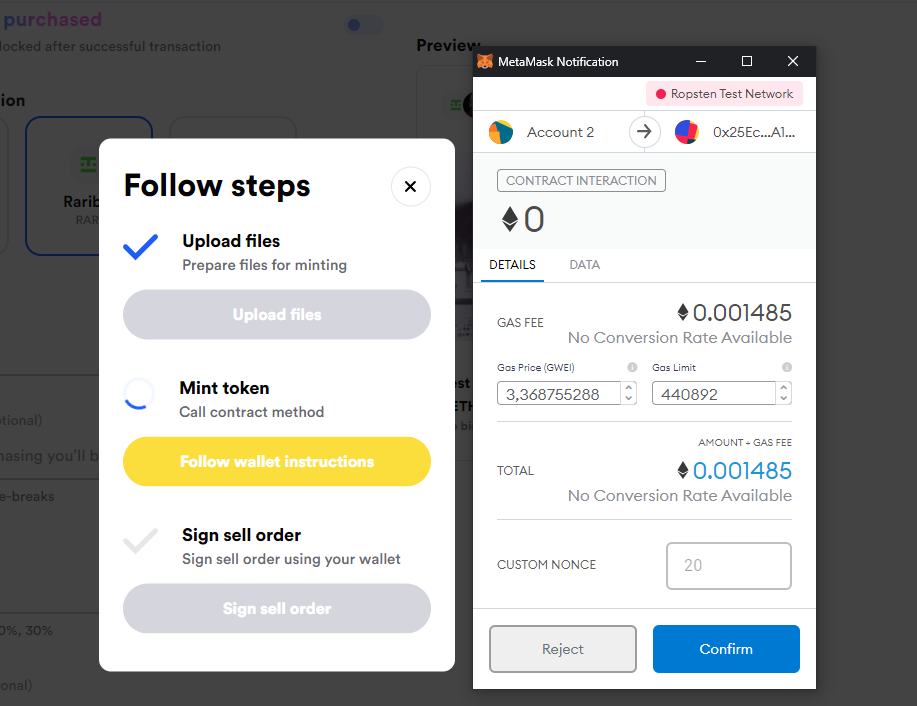
With all that done, it’s time to actually put your NFT out there and hopefully make some money. On most platforms, doing so is as simple as hitting a button that says “sell” on whatever NFT you have in your wallet.
The screenshot below shows how it works on Rarible using the MetaMask wallet. Note the Ethereum gas fees.
In practically all cases, you have a few options on how you want to sell your NFT. These usually fall into one of three categories: fixed price, timed auction, or unlimited auction—which Rarible calls “open for bids.”
A fixed price is simplest to explain: you put your NFT up at a certain price and you wait for somebody to pay that amount. OpenSea lets you put a time limit on this price if you want, but other than that it’s the same.
A timed auction is also relatively common: in a certain time span, which you can decide, potential buyers will bid on your NFT. When the time limit expires, the highest bidder receives the NFT. An unlimited auction is an auction without a time limit, the seller simply decides when they have received what they think is the best offer and ends the auction.
From here the process runs pretty much automatically: the buyer pays what they’re supposed to for the NFT plus some fees, the creator gets their money minus some fees, and the NFT changes hands. The buyer gets a cool little collectible, and you, the seller, gets the start of a cryptofortune—hopefully.
Also read:
- [New] In 2024, Basics of Weaving a Narrative Thread
- [New] In 2024, Twitter Backlog Utilizing Past Tweets
- [New] Revolutionize Your Online Audio with These 5 Methods for 2024
- [New] Smile and Share Easy Memes via KineMaster
- [Updated] 2024 Approved Building Engaging Learning Experiences YouTube as Your Classroom Screen
- [Updated] In 2024, Elevate Viewing Experience – Enable AV1 on YouTube
- 2024 Approved Unlocking the Art of iPhone Podcast Downloads with Ease
- A Step-by-Step Guide on Using ADB and Fastboot to Remove FRP Lock from your Infinix Note 30 VIP
- Master the Connection: Merge Your Android with Chromebook for Enhanced Productivity & Why It Matters | ZDNET
- Mastering Multitasking: Learn About the New Triad of Google Chrome Features for Superior Tab Organization, as Revealed by ZDNet
- Qualcomm Unveils Clandestine Collaboration with Samsung and Google for Next-Gen Smart Mixed Reality Spectacles, Explored | ZDNET Insights
- Securing Digital Lives: Discover How Google Chrome Introduces Three New Safety Measures for Improved Privacy Online | CNET News
- Surprising Leaders: Discovering the Best Smart Thermostats Beyond Ecobee and Amazon on ZDNet's Reviews
- ZDNet Reviews: Google's Revolutionary GemiNus Models Set New Standards for 'Perfect Recall' In AI Technology
- Title: Step-by-Step Guide: Creating Your Own Digital Collectible (NFT)
- Author: John
- Created at : 2024-12-24 22:32:55
- Updated at : 2024-12-25 20:20:02
- Link: https://techno-recovery.techidaily.com/step-by-step-guide-creating-your-own-digital-collectible-nft/
- License: This work is licensed under CC BY-NC-SA 4.0.